Audio panning modes
When you pan stereo audio tracks, 5.1 surround tracks, or busses, you can right-click the fader handle (or surround panner) and choose a pan type to change the panning model.
TIP If you want to set the default pan type for new tracks, set a track's pan type, and then use the Set Default Track Properties dialog to set that track's pan type as the default. For more information, see Setting default track properties
NOTE The selected panning mode is also used for track-level pan envelopes. For more information, see Audio track automation
|
Mode |
Description |
|---|---|
|
Add Channels |
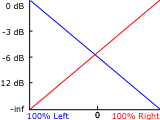
This mode is most useful for panning stereo files. As you pan across the stereo field, the stereo image appears to move across the speakers. As you pan toward either side, the signal from the opposite channel is added to the channel you are panning toward until at the extreme both channels are sent to a single channel at full volume. This mode uses a linear panning curve. IMPORTANT You can introduce clipping when channels are added. Monitor the meters in the Master Bus window and adjust the track volume accordingly. |
|
Balance (0 dB center) Balance (-3 dB center) Balance (-6 dB center) |
In a stereo project, this mode can help you adjust the relative signal levels of the channels in stereo source material. As you pan from the center to either side, the opposite channel begins at the specified center value (0 dB -3 dB, or -6 dB), and decays to -infinity. The signal in the side you are panning toward progresses from the specified center value (0 dB -3 dB, or -6 dB) to 0 dB. This panning mode uses a linear panning curve. For example, when you pan fully right, the right channel is played at 0 dB and the left channel is not audible. As you pan to the center, each channel is attenuated to the specified center value (0 dB -3 dB, or -6 dB). As you pan to the left, the left channel is played at 0 dB, and the right channel is not audible.
With the Balance (0 dB center) setting, no gain or cut is applied when you're panned to the center, which can make the center seem louder.
With the Balance (-3 dB center) setting, a -3 dB cut is applied when you're panned to the center.
Panning in a 5.1 surround project follows the same rules: as you pan from the center to any channel in a 5.1 surround project, the signal in the channel you are panning toward progresses from the specified center value to 0 dB. The signal in the channel you are panning away from begins at the specified center value and decays to -infinity. |
|
Constant Power |
This mode is most useful for panning monaural source material. In this mode, sound will maintain its volume when you pan across channels. If you pan a stereo file 100% R, only the right channel of your media file is played, and this channel is sent to both output channels. If you continue to pan to the left, the left channel is gradually added to the output, and the right channel is gradually faded out until only the left channel will be heard through both output channels when the slider is at 100% L.
If you pan a file fully right midway between the front and rear channels in a 5.1 surround project, only the right channel of your media file is played, and this channel is sent to the right-front and -rear output channels. If you pan to the left, the left channel is gradually added to the output, and the right channel is gradually faded out until only the left channel is sent to the left-front and -rear output channels. |
|
This mode allows you to pan between pairs of adjacent speakers in 5.1 surround projects using a constant power model. This mode is optimized for theater-style speaker placement. In stereo projects, Film mode functions identically to Constant Power. As you drag the pan point to the center speaker, the sound becomes diffused through the front and rear speakers. When the track is panned fully to the center speaker, there is no output from the front and rear speakers. Dragging the pan point to the center of the surround panner sends the signal to all speakers. NOTE
If you're panning fully to a single speaker, you may notice that some signal is mixed to the opposite speaker. This is because the ideal placement for surround speakers does not match the representation in the surround panner. For example, panning to the front-left speaker produces a low-level signal in the rear-left speaker. This is because your front-left speaker should be positioned 30° left of center and the speaker in the surround panner is located 45° left of center. To produce a true 45° left-of-center pan, the signal is panned between the front- and rear-left speaker. |


