Color Grading
The Color Grading panel provides a powerful set of color-grading and correction tools. It can be used for any video media in your project including High Dynamic Range (HDR) footage.
The panel can be applied to all four effect layers, including:
-
Events
-
Tracks
-
Media
-
Video output bus
You can apply the panel at any of the levels exclusively, all of them simultaneously, and any combination in between.
Open the Color Grading Panel
Each level has a control to open the Color Grading panel and set it to work at that level.
Applying Color Grading at a specific level
-
Add several video events to your timeline.
-
Select one of the video events and click the Color Grading
 button in the The Transport and Editing Toolbar.
 Alternative: In the main menu click Tools | Video | Color Grading
.This opens the Color Grading panel and by default it is set to apply changes at the Event FX level. Any change you make to the controls in the panel will be applied to the selected event. When the panel is open, you apply it to any event you select on your timeline.
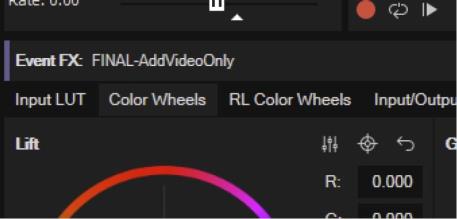
A label at the upper left corner of the panel identifies the level at which the changes will be applied (in this case, it says Event FX) and the name of the active take in the video event you’ve selected. Click different events on your timeline to see that the label changes accordingly. This label will become quite important to you as you need to keep straight which level you’re currently working at.
NOTE Notice that a color bar before the label matches the track color of the track the selected event sits on, which also helps you identify exactly where you’re working.
At the event level:
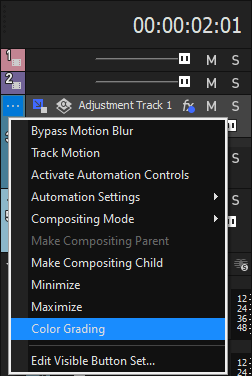
Click an event’s More button and choose Color Grading from the More menu. This opens the Color Grading panel set to apply your changes at the event level.
At the Track level:
Click the Track’s More button and choose Color Grading. If the Color Grading panel is open when you do so, this simply switches the panel’s focus from the event level (or whatever is the current level) to the track level. Any changes you make apply to the track level. If the Color Grading panel is not open when you choose this option, this opens the panel and sets its focus to the Track FX.
At the Media level:
Click the Project Media tab to open the Project Media window.
Right-click the thumbnail for the media file you want to grade and choose Color Grading from the context menu.
At the Video Output Bus level:
Right-click the Video Preview window and choose Color Grading from the context menu.
Select the level you want to work at
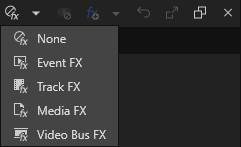
Click the Add to FX Level drop-down arrow in the button bar of the panel. This reveals a drop-down list with several options:
|
None |
Select this option when you want to leave the Color Grading panel open but don’t currently want to use it. This setting ensures that you don’t inadvertently add the Color Grading panel every time you select an event or other object in your project. |
|
Event FX |
This activates the panel at the event level. This matches the behavior of previous versions and is the default behavior when you open the panel. With this selected, the panel will be applied to any event you select when the Color Grading panel is open. The panel will not be applied at any other level. |
|
Track FX |
This activates the panel at the track level. With this selected, the panel will be applied to any video or video adjustment track that you select when the Color Grading panel is open. The panel will not be applied at any other level. |
|
Media FX |
This activates the panel at the media level. With this selected, the panel will be applied to any clip that you select in the Project Media window when the Color Grading panel is open. The panel will not be applied at any other level. |
|
Video Bus FX |
This activates the panel at the video output level. With this selected, the panel will be immediately applied to all of your video output. Use this if you want a color change on every piece of video in your project. Be aware that this will also affect generated media such as text and titles. The panel will not be applied at any other level. |
Notice that upon selecting any of these options, that option becomes highlighted in the list and the "Add to FX Level" button icon changes to reflect the specified level. The label also updates to indicate the currently active level. If you have set the panel to the event level but don’t have any video events selected, the label reads None.
TIP Even though you can only activate one level at a time, you can still use the panel at any or all of the levels simultaneously. So, you could create one color adjustment to the media, then another to the track that holds an event that uses that media, another to the event that holds the media, and then a fourth at the video bus output.
You can use this to create different types of adjustments for different purposes. For instance, you might create correction adjustments at the media level so that each time the media appears in your project it has that same adjustment. At the same time, you might then apply changes at the event level to create a special color effect for just that one instance of the clip on the timeline. You now have much flexibility.
NOTE Keep in mind that when you export a LUT from the Color Grading panel, only the currently selected level will be included in that LUT.
Color Keys
The Color Grading Panel supports a selection of edits that you can control with the keys on your 10-key number pad. These adjustments enable you to fine tune your color adjustments quickly in multiple ways.
To use these keys:
-
Click the Color Grading button to open the Color Grading panel. The keys work on both the traditional Color Wheels and the RL Color Wheels tabs.
-
Click the Color Wheels tab if necessary to bring focus to that section.
-
Click one of the color wheels that you want to adjust.
Notice a gray bar indicates that the wheel now has focus. You can now use your keyboard’s number pad to make adjustments to the settings for this selected wheel.
The following table shows the keys and their functions. You can see the effect of many of these adjustments in the Video Preview window, and the Vector scope is also useful for seeing what’s happening as you press the various keys.
|
Number pad key |
Function |
|---|---|
|
Num 7 |
Adds 0.1 to the Red value |
|
Num 4 |
Subtracts 0.1 from the Red value |
|
Num 8 |
Adds 0.1 to the Green value |
|
Num 5 |
Subtracts 0.1 from the Green value |
|
Num 9 |
Adds 0.1 to the Blue value |
|
Num 6 |
Subtracts 0.1 from the Blue value |
|
Num + |
Adds 0.1 to the Y value |
|
Num Enter |
Subtracts 0.1 from the Y value |
|
Num 1 |
Subtracts 0.1 from the Cyan value |
|
Num - |
Adds 0.1 to the Cyan value |
|
Num 2 |
Adds 0.1 to the Magenta value |
|
Num 0 |
Subtracts 0.1 from the Magenta value |
|
Num 3 |
Adds 0.1 to the Yellow value |
|
Num . |
Subtracts 0.1 from the Yellow value |
-
For any of the key combinations above, hold the Ctrl key to change the present value by 0.01 instead of 0.1.
-
The Backspace key resets the currently focused control to its default values