Adding transitions
Choose View | Window | Transitions to display or hide the Transitions window. Use this window to choose and preview transition effects that you can use to control how a video event begins or ends, or to change the way one event flows into another.
At the top of the window you can see the available video effects organized into categories. In addition to categories such as Fades, Wipes or 3D Effects, there are three special categories:
-
All plug-ins: All available plug-ins are listed here.
-
Third party: Additionally installed third-party plug-ins are displayed here. If you select this category, an additional Filter drop-down menu will appear in the upper right corner, where you can filter the third-party plug-ins by provider.
-
Favorites: All plug-ins that you have marked as favorites are listed here. You mark a plug-in as a favorite by clicking on the little star in front of the plug-in name
 .
.
The left pane lists each of the available transitions of the selected category. The thumbnail images in the right pane represent each of the existing presets for the selected effect. Hover your cursor over a preset to see an animated example.
Drag a transition preset to overlapping video events in the timeline to add a transition.
-
You can type in the Search plug-ins box to find plug-ins. For example, if you wanted to find a specific color-correction plug-in, you could type "color" in the box to display only plug-ins that include the term "color" in the plug-in name, description, or group name.
-
To apply a preset without displaying the Video Event FX dialog, hold the Shift key while dragging a preset from the Transitions window to the timeline.
-
To move faders and sliders in fine increments, hold Ctrl while dragging the control.
-
Select Event Fade Lengths from the View menu to display fade lengths between selected and non-selected events in the timeline. You can use this display as a quick indicator of a transition's length.
-
Double-click the title bar of the Video FX window to resize it for the current plug-in.
Adding transitions to events
-
Choose View | Window | Transitions to display the Transitions window.
-
Select a transition from the list on the left side of the window. The thumbnail images on the right side of the window represent each of the existing presets for the selected transition. Point to a preset to see an animated example.
-
After you've found the preset you want to use, drag it to the position where you want it to occur on the timeline.
You can drop the transition at either end of an event, between two overlapping events, or between two adjacent events.
The Video Event FX window is displayed to allow you to edit the transitions settings, and a Transition Properties button
 is displayed in the timeline to show you where the transition takes place. You can also click this icon to edit the transition's settings.
Adding a transition to all selected events
If you tend to use the same transitions often, you can save yourself some time by adding a transition to all selected events.
-
Select the events where you want to add the transition.
-
Choose View | Window | Transitions to display the Transitions window.
-
Select a transition from the list on the left side of the window. The thumbnail images on the right side of the window represent each of the existing presets for the selected transition. Point to a preset to see an animated example.
-
After you've found the preset you want to use, drag it to one of the selected events.
The new transition replaces all existing transitions in the selected events.
The Video Event FX window is displayed to allow you to edit the transitions settings, and a Transition Properties button
is displayed in the timeline to show you where the transition takes place. You can also click this icon to edit the transition's settings.
Dropping on existing cuts, crossfades, or transitions
-
If you drop the preset on an existing transition, only transitions within the selection will be changed. Cuts and crossfades are preserved.
-
If you drop the preset on an existing crossfade, only crossfades and transitions within the selection will be changed. Cuts are preserved.
-
If you drop the preset on an existing cut, all cuts, crossfades, and transitions within the selection will be changed.
Dropping on event edges
-
If you drop the preset on a transition that is at the beginning or end of an event (but does not span two events), only single-event transitions that occur on the same end of the event within the selection will be changed.
-
If you drop the preset on an event fade-in or -out, event fade-ins/outs and single-event transitions that occur on the same end of the event within the selection will be changed.
-
If you drop the preset on an event edge with no fade, all other event edges, event fade-ins/outs, and single-event transitions that occur on the same end of the event within the selection will be changed.
NOTE To change the length of the transition for cuts that are converted to transitions, use the Cut-to-overlap conversion settings on the Editing tab of the Preferences dialog.  For more information, see Preferences - Editing Tab
Changing the speed/duration of a transition
After you've added a transition to an event, you can easily adjust its duration, which will change the speed at which the transition occurs.
Adjusting a transition at the beginning or end of an event
-
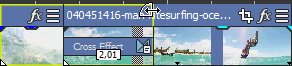
Hover over the edge of the transition until the fade cursor
 is displayed.
 -
Drag the edge of the transition to set its new length:
Adjusting a transition between two events
Drag either of the events to change the amount of overlap between them. The transition length is updated to match the overlapping area:
![]()
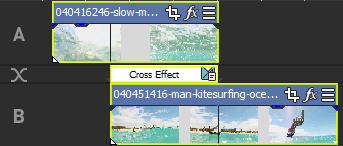
Right-click a track header and choose Expand Track Layers from the shortcut menu to reveal the A roll, B roll, and transition roll. In this view, sequential clips alternate between the A and B rolls, and the overlapping area between events is represented by the transition roll.
Editing a transition
Click the Transition Properties button ![]() on a transition to change the transition's settings.
on a transition to change the transition's settings.
Changing to a different transition
-
Click the Transition Properties button
on an event to display the Video Event FX window. -
Drag a different transition from the Transitions window to the Video Event FX window.
Adding a transition progress envelope
Normally, a transition progresses from 0 to 100% in a linear fashion over the length of the transition. A transition progress envelope gives you complete control over a transition: you can hold, reverse, and repeat individual transitions.
-
Right-click a transition.
-
From the shortcut menu, choose Insert/Remove Envelope, and then choose Transition Progress from the submenu. An envelope is added to your transition.
-
Add points and adjust the fade curves as desired.
For more information, see Adjusting envelopesIn the following example, the transition starts, progresses to 50%, reverses direction, and then finishes.
Transition Progress with animation
*new since VEGAS Pro 20*
The Transition Progress envelope enables the user to control the rate of a transition over time and animate the progress so that it goes fast, slower, or even in reverse. This gives the user power to create custom transition behavior and includes Bèzier curve tools for complete control over the rate of change between animation points along the curve.
![]()
-
Add two video clips to the same track in your timeline and overlap them to create a crossfade.
-
Make the overlap at least a second long so that you can see the results more clearly.
-
In the Window Docking area, click the Transitions tab.
-
Drag a transition onto the crossfade area. Something simple like a Clock Wipe or Linear Wipe works well for experimentation.
-
In the timeline, click the transition’s Transition Properties
button. -
In the Video Event FX window, click the Transition Progress button. This opens the keyframe timeline for the transition.
-
Click the Curves button to enter curve editing mode.
-
Double-click the envelope line to add a point.
-
Drag the point to a new position around .60, or use the Transition Progress slider to adjust the point.
-
Add another point to the envelope line. Set this point to a value of 0.00.
-
To set the curve type for the curve after a point, right-click the point and choose the curve shape you want. If you select one of the Bèzier curve types, adjust the curve handles until you achieve the shape you want.
-
When you’re done, click in your timeline to place the cursor before your transition and play your project.
You’ll see the transition start, speed up, reverse, and finally finish. You can add as many points to the envelope as you want to.
Removing a transition
-
Click the Transition Properties button
on an event to display the Video Event FX window. -
Click the Remove Selected Plug-In button
 to remove the current transition.
Converting a cut to a transition
When you have two video events that are inserted back-to-back with no transition (referred to as a cut), you can convert the cut to a transition by dragging a transition from the Transitions window and dropping it between the events.
You can also right-click between the two events, choose Transition from the shortcut menu, and choose a crossfade or transition type from the submenu.
One or both of the events will be extended so they overlap, allowing room for the transition. Use the Alignment drop-down list under the Cut-to-overlap conversion heading on the Editing tab of the Preferences dialog to determine where the transition is placed. For more information, see Preferences - Editing Tab
NOTE There must be sufficient media on each side of the cut to accommodate the overlap time specified on the Editing tab of the Preferences dialog.
Converting a crossfade or transition to a cut
-
Click to position the cursor within the transition.
-
Hold Ctrl while pressing the / key on your numeric keypad.
The transition is converted to a cut, using the Cut-to-overlap conversion settings on the Editing tab of the Preferences dialog to determine where the cut occurs.
For more information, see Preferences - Editing Tab
GL Transitions
The GL Transitions project is an open-source development initiative that aims to establish a universal collection of transitions. The implementation of GL Transitions into VEGAS Pro opens a world of possibilities for modern transition types. You can simply apply these transitions as presets inside VEGAS Pro, or you can customize transitions and even create completely new ones of your own.
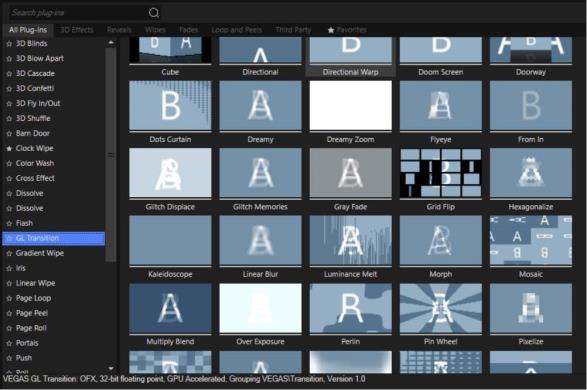
How to add one of around 50 existing GL Transition presents:
-
Click the Transitions tab in the window docking area to bring that window forward.
-
Select GL Transition from the list of transitions on the left.
-
Hover over the various presets on the right to preview them and find the one you want.
-
To apply a transition preset to your project, drag the preset from the Transitions window onto a crossfade between two timeline clip events.
-
The different transitions have unique parameters and controls. Adjust the controls to customize the transition you’ve added.
How to create a new or customized GL Transition
-
Add the Default preset to your timeline.
-
Enter or paste the code for your custom transition (the code must be written in GLSL) into the code window.
TIP To learn more about the GL Transitions project, visit the GL Transitions website.
Unfortunately, in the initial release of this feature, some users will experience problems including an “Invalid Shader” message. This is related to CPU usage and some Nvidia Gfx graphics cards that don’t support OpenCL/OpenGLinterops.
If you experience these problems, you can work around them with this procedure:
- Right-click the crossfade on your timeline.
- Choose Transition Properties from the context menu.
- Use the Plug-in-Chooser to add the GL Transitions.
- Select the preset you want from the Preset drop-down list in the Video Event FX window.