Editing event properties
Right-click an event and choose Properties from the shortcut menu to use the Event Properties dialog to modify an event.
Editing the name of the active take
If you have recorded multiple takes, you can edit the take names in the Event Properties dialog.
-
Right-click the event and choose Properties from the shortcut menu.
-
On the Audio Event tab, enter or edit the take name in the Active take name box.
-
Click OK.
Changing event switches
-
Right-click the event and choose Properties from the shortcut menu.
-
On the Audio or Video Event tab, select the switches you want to use.
For more information, see Applying switches to events
-
Click OK.
Time-stretching or pitch-shifting an audio event
NOTE The Resample and stretch quality setting on the Audio tab of the Project Properties dialog determines the quality of processing when time-stretching audio events. 
Editing from the timeline
-
Select an event.
-
Use the = and - keys on your keyboard (not the numeric keypad) to adjust pitch:
Key
Result
=
Raise pitch one semitone.
Ctrl+=
Raise pitch one cent.
Shift+=
Raise pitch one octave.
Ctrl+Shift+=
Reset pitch.
-
Lower pitch one semitone.
Ctrl+-
Lower pitch one cent.
Shift+-
Lower pitch one octave.
Ctrl+Shift+-
Reset pitch.
If Active Take Information is selected from the View menu, the event's pitch Shift is displayed in the bottom-left corner of the event. If the media has a known root note, the new root is displayed in parentheses.

Editing in the Event Properties dialog
-
Right-click the event and choose Properties from the shortcut menu.
-
On the Audio Event tab, choose a setting from the Method drop-down list.
Changing the playback rate of or undersample a video event
-
Right-click the event and choose Properties from the shortcut menu.
-
On the Video Event tab, adjust the Playback rate and Undersample rate controls.
Setting
Description
Playback rate
Enter a value in the box to set the rate of playback. For example, a setting of 1 will play at normal speed, while 0.5 will play at half speed.
Each video event in your project has a specific duration that is not changed by adjusting the playback rate. If you decrease the speed of a ten-second video event by 50%, only five seconds of video will be shown. On the other hand, if the speed is increased 200%, the ten seconds of video will play in only five seconds. The remaining five seconds of the event will be filled either with a freeze of the last frame or with ten additional seconds of video content from the media file (if the source media is longer than the event).
Expanded lower limit for playback rate
The lower limit for the event playback rate has been greatly expanded to enable super slow motion sequences.

Changing the playback rate
-
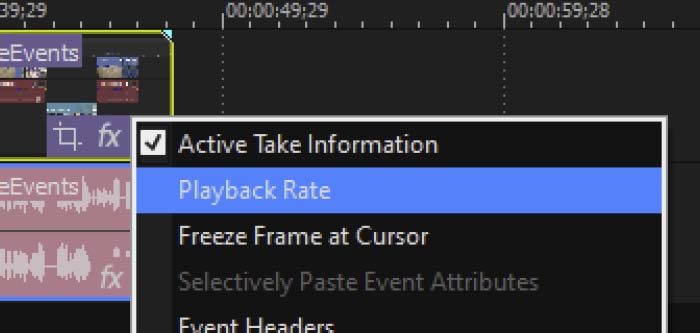
Click the More
button and choose Playback Rate from the menu.
-
In the Properties dialog box, enter the value you want into the Playback Rate field, or use the Playback Rate slider controls to set the value you want.
-
Set the rate to as low as 0.05.
-
When you’ve entered the rate you want, click OK.
Click to adjust the playback rate of a high-frame-rate clip to play using the project frame rate.
For more information, see Working with high-frame-rate (HFR) clips
Undersample rate
Enter a value in the box to simulate a lower frame rate. For example, if you enter 0.5 in the box, the event will play at half its original frame rate, and each frame will be held twice as long as in the original media file, creating a strobe effect.
-
-
Click the OK button.
Expanded lower limit for playback rate
The lower limit for the event playback rate has been greatly expanded to enable super slow motion sequences.

Changing the playback rate
-
Click the More
button and choose Playback Rate from the menu.
-
In the Properties dialog box, enter the value you want into the Playback Rate field, or use the Playback Rate slider controls to set the value you want.
-
Set the rate to as low as 0.05.
-
When you’ve entered the rate you want, click OK.
Editing information about the media file
-
Right-click the event and choose Properties from the shortcut menu.
-
Click the Media tab.
-
Edit the settings as needed.
For more information, see Viewing or changing media file properties
-
Click the OK button.
Viewing media file properties
-
Right-click the event and choose Properties from the shortcut menu.
-
Click the General tab.
The General tab displays information about the event's source media file, streams, metadata, and the plug-in used to read the file.
-
Click the OK button.