Blurring a Face (or Any Portion of a Video)
You've seen the effect on daytime talk shows and police dramas (and if you're lucky, you weren't the one being blurred). The effect is simple to recreate using VEGAS Pro and Bézier masking.
|
|
|
|
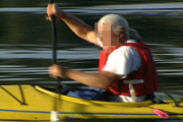
Before Masking |
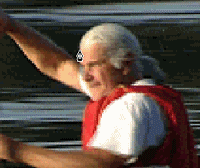
After Masking |

-
Right-click the track that contains the video you want to blur and choose Duplicate Track from the shortcut menu. This creates a copy of the video where we can apply the blurring effect.
-
Create a mask to limit the blurring effect:
-
Click the Event Pan/Crop button
 on the upper event. The Event Pan/Crop plug-in is displayed in the Video Event FX window.
 -
Select the Mask checkbox in the keyframe controller.
-
Select the anchor creation tool
 on the left side of the Video Event FX window and click in the workspace to create a mask.
The following image shows how we created a simple Bézier curve around a face. We added anchor points around the perimeter of the face and then adjusted the tangent control to match the curvature of the hairline more closely. For more information about creating Bézier masks, see Panning and cropping video events
-
Expand the Path heading on the left side of the window and choose Positive from the Mode drop-down list.
TIP If you want to blend the blurring effect with the unblurred video, use the Feather type and Feather % controls to feather the edges of your mask.
-
If the subject you want to blur moves within the frame, use the keyframe controller at the bottom of the Video Event FX window to establish distinct mask settings throughout the duration of the event so the mask follows the portion of the video you want to blur.
-
-
Apply a plug-in to the upper event create the blur effect:
-
Click the Plug-In Chain button
 in the Video Event FX window to display the Plug-In Chooser.
 -
Add a plug-in to the event. The Pixelate plug-in works well with the Medium or Large preset.
-
-
Play your project. The blurring is applied to the video and its effect is confined to the mask you created in step 2.