Panning and cropping video events
Use Crop if you want to cut out portions of an image. There are two different methods for cropping an event. Use the Crop OFX plug-in, found in the Video FX window, or use the internal Pan/Crop tool accessed by clicking the Crop icon in the event header.
The main benefits of using the Crop OFX plug-in are the ease of use provided by the Video Preview interact and it can used where ever you can apply OFX effects, - media, event, track, project.
Crop using the Crop OFX Plug-in
You can apply the Crop OFX plug-in at all the same places you can apply any OFX Plug-in; Media level, Project, Track or Event. To take advantage of the Preview Window interacts it is best applied at the Track or Event level. In this example, we’ll add it to a specific event.
- With at least one event on the timeline, open the Video FX window
- Expand the OFX folder
- Choose Crop
- Drag and drop the default preset on the event. You now see the Video Event FX window as well as the interacts in the Video Preview window.
- The interact controls include four crop handles; Left, Top, Right, Bottom. Once you drag one of these handles, the handle opposite it becomes the anchor point. e.g., if you drag the right handle the left handle becomes the anchor point. The anchor point has a black dot in the middle of the handle icon.
- To crop off a portion of the image, click and drag a crop handle toward the center. e.g., to crop off the left side of the image, drag the left crop handle toward the center.
- To crop using the Video FX window:
- Click the Anchor Point dropdown arrow and choose an anchor point.
- Use the X Crop or Y Crop slider or enter a specific value in the X or Y text box to set the crop.
- To change the location of the cropped area using the Video Preview interact, click and drag the selection area to a new position.
- To change the Location using the Video FX window, type a new value into the Location text box. Or, click the arrow next to Location in the Video FX window to expand the Location field and click and drag the location control.
- To adjust the Angle using the Video Preview window, click and drag the circle inside the selection area.
- To adjust the Angle using the Video FX window, enter a value in the angle text box, or drag the Angle slider.
- To adjust Opacity, enter a number in the Opacity text box in the Video FX window or drag the Opacity slider.
TIP If you want to create an animated crop, use the keyframe controller at the bottom of the Video Event FX window to establish distinct settings throughout the duration of the event. To access the keyframe controller click the animate button associated with the paramater you want to animate. For more information, see Keyframe animation. Because the parameters are so dependent on each other it is important to have animation turned on for ALL the parameters before you start to animate a crop.
Crop using the Pan/Crop tool
Use the Pan/Crop tool to crop, zoom, rotate, or pan the selected video event. You can also use panning and cropping to add motion to video events created with still images.
You can also use the Pan/Crop tool to create masks using Bézier curves.
TIP To prevent unwanted blurring, you can choose whether effects are applied to the event before or after any event panning and cropping by arranging the Pan/Crop button in the plug-in chain at the top of the Video Event FX window.

Here, the Deform plug-in is applied before the pan/crop and the Glow and Color Curves plug-ins are applied after the pan/crop.
Cropping or zooming a video event
Cropping is the process of removing the outside edges from an image or video without resizing it.
When you use a single setting for the duration of an event, you are cropping the contents of the event. When you add keyframes to change the extent of cropping through the duration of the event, you can create an animated zoom effect.
-
From the Tools menu, choose Video, and choose Video Event Pan/Crop (or click the Pan/Crop button
 on the video event).
The Pan/Crop plug-in is displayed in the Video Event FX window.
-
Adjust the selection area to change the viewable portion of the event.
-
To resize the selection box, drag the handles located around the perimeter of the box. To type specific dimensions for the selection box, expand the Position heading on the left side of the window and type new values in the Width and Height boxes.
Select the Lock Aspect Ratio button
 if you want the selection box to retain its aspect ratio during resizing. When the button is not selected, the height and width can be resized independently.
Select the Size About Center button
 if you want the selection box to retain its center point when you resize the box by dragging its edges. When the button is not selected, the opposite side of the selection box will remain anchored when you drag the edges to resize it.
 -
To reposition the selection box, click in the middle of the selection area and drag to a new position. To type a specific location, expand the Position heading on the left side of the window and type new values in the X Center and Y Center boxes.
When Move Freely
 is selected, you can move the selection box along the X or Y axis. When Move in X Only
  is selected, you can only move the selection box horizontally. When Move in Y Only
  is selected, you can only move the selection box vertically.
 -
To zoom in on the selection so the selection fills the output frame, expand the Source heading on the left side of the window and choose Yes from the Stretch to fill frame drop-down list. When No is selected, the media retains its original size, and the area outside the selection box is cropped.
-
The cropping or zooming occurs instantly and the results are updated in the Video Preview window.
-
If you want to create an animated crop or zoom, use the keyframe controller at the bottom of the Video Event FX window to establish distinct zoom settings throughout the duration of the event.
During playback, intermediate frames are interpolated to create smooth motion. Expand the Keyframe interpolation heading on the left side of the window and drag the Smoothness slider to adjust the interpolation.
 For more information, see Keyframe animation
TIP Right-click the workspace to display a shortcut menu that displays commands to restore, center, or flip the selection box. You can also force the box to match the source media's aspect ratio or your project's output aspect ratio. Matching the output aspect ratio can prevent black bars from appearing when you use source media (such as photographs) that does not match your project's aspect ratio.
TIP Use the Default Pan/Crop smoothness control on the External Control & Automation tab of the Preferences dialog to set the default Smoothness value for new keyframes.
Creating a Bézier mask
Select the Mask checkbox in the keyframe controller at the bottom of the Video Event FX window and use the controls in the Path heading on the left side of the Pan/Crop plug-in to create masks using Bézier curves.
Each event can contain multiple Bézier masks.
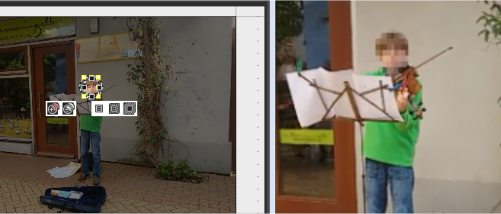
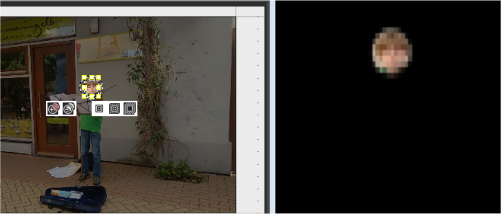
For an example of how to use a Bézier mask with the Pixelate plug-in to blur a subject's face, see Blurring a Face (or Any Portion of a Video)

FIGURE Video Tracks
FIGURE Bézier Mask

FIGURE Video Output
TIP Double-click the mask shape in the workspace to edit its properties. For more information, see
Editing a mask
Bézier curve types for OFX automation
OFX automation curves can be modified with Bézier curves. This enables you to customize your curve shapes between keyframes of OFX parameters.

Control curves with Bézier handles:
-
Add an OFX plug-in to your project.
-
Click the Animation button for the parameter you want to animate.
-
In the Animation timeline section, click the Curves tab.
-
Double-click the animation envelope to add a point to it.
-
Right-click the newly added point. In the context menu, you see all of the normal options, including the standard curve shapes.
At the bottom of the menu you have two options, which replace the Manual options of previous versions:
-
Bézier curve (locked tangents):
Choose this option to add Bézier tangents that cannot be moved independently from one another. As you move one handle, the other handle moves in an equal-but-opposite manner. This causes the curves on both sides of the automation point to adjust regardless of which of the two handles you manipulate.
-
Bézier Currves (split tangents):
Choose this option to add Bézier tangents that can be manipulated independently of one another. This enables you to adjust the curve on one side of the envelope point without affecting the curve on the other side of the point
-
NOTE Old projects in which you used the Manual curve controls will be updated to use these new Bézier controls if you open those projects in this new update of VEGAS Pro or any subsequent update.
Creating a rectangular or oval mask
Use the Rectangle or Square Mask Creation Tool or Oval or Circle Mask Creation Tool
 on the left side of the Video Event FX window to quickly create new masks. Each event can contain multiple masks.
-
From the Tools menu, choose Video, and choose Video Event Pan/Crop (or click the Pan/Crop button
on the video event). The Pan/Crop plug-in is displayed in the Video Event FX window. -
Select the Mask checkbox in the keyframe controller at the bottom of the Video Event FX window.
-
Click the Rectangle or Square Mask Creation Tool
or Oval or Circle Mask Creation Tool on the left side of the Video Event FX window. -
Click and drag in the workspace to create a mask.
-
Hold Shift while dragging to constrain the mask to a square or circular shape.
-
Hold Ctrl while dragging to scale the mask shape from its center.
-
When creating an oval or circular mask, hold the left or right Alt key to create a half-oval (or half-circle) mask.
-
When creating a rectangle or square mask, hold Alt to create a mask with rounded corners.
-
-
Double-click the mask shape in the workspace to edit its properties.
For more information, see
Editing a mask
Masking event effects
You can use the Apply to FX control on the left side of the Video Event FX window to mask video event effects.
-
Apply an effect to your video event. For example, if you wanted to blur a subject's face, you could use the Pixelate plug-in.
For more information, see Adding video effects -
Create a mask around the portion of the event where you want the effect applied.
For more information, see Creating a Bézier mask
or
Creating a rectangular or oval mask
-
Select the Mask checkbox in the keyframe controller at the bottom of the Video Event FX window and expand the Mask heading on the left side of the window.
-
Choose Yes from the Apply to FX menu.
When you choose Yes, the video event effects will be applied only to the mask area:
When you choose No, the mask is applied to the frame:
Editing a mask
After you create a Bézier, rectangular, or circular mask, you can use the tools in the workspace to edit the mask
-
Double-click the mask shape in the workspace to edit its properties:
-
Click the Positive Mask
 or Negative Mask button
  to choose whether you want to mask the area inside or outside the mask shape.
TIP You can also choose Positive or Negative from the Mode drop-down list in the Path heading on the left side of the Pan/Crop plug-in.
-
If you want to feather the edge of the mask shape, select the Feather Inside
 , Feather Both
 , or Feather Outside
 button and drag the slider below the mask shape to adjust the feather amount.
TIP You can also use the Feather type and Feather (%) controls in the Path heading on the left side of the Pan/Crop plug-in.
-
To move a mask, double-click the path to select it, and then drag it within the workspace.
-
You can also hold Alt+Shift while clicking a mask to select or deselect it.
-
You can also use the Position controls on the left side of the Pan/Crop plug-in to move selected masks.
-
To scale or rotate a selected mask, use the drag handles around the shape. Hold Ctrl or Shift to constrain movement.
-
Hold Shift while rotating a mask to constrain rotation to 15-degree increments.
-
To flip selected masks, right-click the mask and choose Flip Horizontal or Flip Vertical from the shortcut menu.
-
To duplicate a mask, right-click the mask and choose Duplicate from the shortcut menu (or hold Ctrl while dragging a selected mask to a new position).
Rotating a video event
-
From the Tools menu, choose Video, and choose Video Event Pan/Crop (or click the Pan/Crop button
on the video event).The Pan/Crop plug-in is displayed in the Video Event FX window.
-
Adjust the selection area to crop the event. (If you rotate the entire frame, the background behind the video event will show through.)
-
Drag the corner of the selection box to rotate the event. Your cursor is displayed as a
 .
.To type a specific rotation angle, expand the Rotation heading on the left side of the window and type a new value in the Angle box.
-
If you want to rotate your video around a center point other than the center of the selection box, drag the point at the center of the selection point.
To type a specific center point, expand the Rotation heading and type new values in the X Center and Y Center boxes.
As you rotate your event, the video will rotate about this center.
The rotation occurs instantly and the results are updated in the Video Preview window.
-
If you want to use multiple rotation settings, use the keyframe controller at the bottom of the Video Event FX window to establish distinct settings throughout the duration of the event.
During playback, intermediate frames are interpolated to create smooth motion. Expand the Keyframe interpolation heading on the left side of the window and drag the Smoothness slider to adjust the interpolation.
For more information, see Keyframe animationTIP Use the Default Pan/Crop smoothness control on the Editing tab of the Preferences dialog to set the default Smoothness value for new keyframes.
Panning a video event
You can use event panning to focus on the action of a video event, or you can simulate motion using a still image.
TIP Another use for panning is Pan-and-Scan, which is a technique commonly used when film is converted for television. Movie screens and film are usually wider (~2.35:1) than television (~1.33:1). When you transfer the film to video, you can use panning to crop your video frame and move the crop area to follow the action or subject.
-
From the Tools menu, choose Video, and choose Video Event Pan/Crop (or click the Pan/Crop button
on the video event).The Pan/Crop plug-in is displayed in the Video Event FX window.
-
Adjust the selection area to crop the event. (If you pan the entire frame, the background behind the video event will show through.)
-
To resize the selection box, drag the handles located around the perimeter of the box. To type specific dimensions for the selection box, expand the Position heading on the left side of the window and type new values in the Width and Height boxes.
Select the Lock Aspect Ratio button
if you want the selection box to retain its aspect ratio during resizing. When the button is not selected, the height and width can be resized independently.Select the Size About Center button
if you want the selection box to retain its center point when you resize the box by dragging its edges. When the button is not selected, the opposite side of the selection box will remain anchored when you drag the edges to resize it. -
To reposition the selection box, click in the middle of the selection area and drag to a new position. To type a specific location, expand the Position heading on the left side of the window and type new values in the X Center and Y Center boxes.
When Move Freely
is selected, you can move the selection box along the X or Y axis. When Move in X Only is selected, you can only move the selection box horizontally. When Move in Y Only is selected, you can only move the selection box vertically. -
To zoom in on the selection so the selection fills the output frame, expand the Source heading on the left side of the window and choose Yes from the Stretch to fill frame drop-down list. When No is selected, the media retains its original size, and the area outside the selection box is cropped.
TIP Right-click the workspace to display a shortcut menu that displays commands to restore, center, or flip the selection box. You can also force the box to match the source media's aspect ratio or your project's output aspect ratio. Matching the output aspect ratio can prevent black bars from appearing when you use source media (such as photographs) that does not match your project's aspect ratio.
-
Expand the Source heading on the left side of the window and choose Yes from the Stretch to fill frame drop-down list.
-
Drag the selection box to set the viewable portion the event. Your cursor is displayed as a
 .
. -
Use the keyframe controller at the bottom of the Video Event FX window to establish distinct settings throughout the duration of the event. The path of the panning is drawn in the Video Event FX window.
During playback, intermediate frames are interpolated to create smooth motion. Expand the Keyframe interpolation heading on the left side of the window and drag the Smoothness slider to adjust the interpolation.
For more information, see Keyframe animationTIP Use the Default Pan/Crop smoothness control on the Editing tab of the Preferences dialog to set the default Smoothness value for new keyframes.
Editing keyframe interpolation
If you have two or more keyframes, you can expand the Keyframe interpolation heading and edit the Smoothness setting to adjust the smoothness of the motion.
Smoothness adjusts spatial interpolation: how motion occurs within the frame. A Smoothness setting of 0 produces linear motion from one keyframe to the next. Increasing the setting produces a curved path.
NOTE If you want to adjust temporal interpolation how motion occurs over time change a keyframe type by right-clicking a keyframe and choosing a new interpolation curve type (linear, fast, slow, smooth, sharp, or hold).
During playback, intermediate frames are interpolated to create smooth motion. For more information, see Keyframe animation
TIP Use the Default Pan/Crop smoothness control on the Editing tab of the Preferences dialog to set the default Smoothness value for new keyframes.
Editing source media aspect ratio and stretching
Use the controls in the Source heading on the left side of the Pan/Crop plug-in to indicate how your video will be stretched or cropped.
|
Item |
Description |
|---|---|
|
Choose Yes from the drop-down list (or select the When you choose No, the source media's ratio of height to width is not preserved when video is stretched in the output frame. |
|
|
Choose Yes from the drop-down list if you want the media in the selection box to fill the output frame. When you choose No, the media retains its original size, and the area outside the selection box is cropped. |
Crop video to the project output aspect ratio
When you add video with one aspect ratio to a project whose properties use a different aspect ratio, you will end up with black bars either above and below or to the right and left of your video. To fix this, you can crop your video to an aspect ratio that matches your project settings.
To see this, start a new project. Add a video file to your project—a video that you shot on your mobile device help in portrait mode (up and down) will show this very plainly, and we’ll proceed as if that’s they type of video you’ve added. When VEGAS Pro asks, “Do you want to set your project video settings to match this media?” click Yes.
This sets your project properties to match the file’s properties, including its aspect ratio. For most mobile devices, this will set your project properties to 1080x1920. Notice that this is a 9:16 aspect ratio instead of the normal 16:9 aspect ratio of modern video cameras (and most mobile devices held in landscape mode).
Click to place your cursor inside the video and notice that the Video Preview window shows your video in portrait mode. The video fills the entire live area.
Next, drag a video that was shot in landscape mode onto your timeline. Place your cursor within the new event. Notice that the video does not fill the live area. VEGAS Pro fits it into the frame according to the narrowest aspect in order to show the entire video in the frame. In this case, width acts as the limiting factor, so the video fills the frame side to side, but leaves large black areas above and below.
Crop videos manually
To remove the black bars, you need to crop the video to the proper aspect ratio.
-
Click the event’s Event Pan/Crop button.
-
Right-click the position box in the Event Pan/Crop window and choose Match Output Aspect from the context menu.
This crops the video to the proper aspect ratio. Of course, this means that much of your video gets cropped out.
-
Adjust the position of the crop box to include a more important section of the video in the live area if you need to.
Crop videos automatically
-
In the main menu, click Options | Preferences | Editing tab.
For more information, see Preferences - Editing Tab -
Select the Automatically crop video files added to the timeline checkbox.
Notice that another preference directly below it enables you to do the same with still images you add to your project.
-
Click OK.
To adjust the cropping, click the event’s Event Pan/Cropbutton. Just as before, in the Event Pan/Crop dialog box you can reposition the crop area to focus on the portion of your video that you find most important.
Editing workspace display settings
Use the controls in the Workspace heading on the left side of the Pan/Crop plug-in to change the display.
|
Item |
Description |
|---|---|
| Zoom |
To change the magnification of the video in the workspace, select the Zoom box and type a new setting, or select the box and click the |
| X offset |
To pan the display left or right, select the X offset box and type a new setting, or select the box and click the Negative values move the video to the left, positive values move to the right, and 0 represents the horizontal center of the workspace. |
| Y offset |
To pan the display up or down, select the Y offset box and type a new setting, or select the box and click the Negative values move the video up, positive values move the video down, and 0 represents the vertical center of the workspace. |
| Grid spacing |
Select the Grid spacing box and type a new setting or select the box and click the |
 button to display a slider that you can use to adjust the magnification level.
TIP You can also change the X offset and Y offset values by hovering over the workspace until the pointer is displayed as a  and dragging the workspace to pan in any direction.
Editing the selection box
Use the controls in the Edit heading on the left side of the Pan/Crop plug-in to edit the selection box in the window.
|
Item |
Description |
|---|---|
| Snap to grid |
Choose Yes from the drop-down list if you want to snap the edges of the selection box to the workspace grid when you drag to resize or move the box. When you choose No, you can move and resize the selection box freely. |
| Lock aspect |
Choose Yes from the drop-down list if you want the selection box to retain its aspect ratio during resizing. When you choose No, the height and width can be resized independently. |
| Scale about center |
Choose Yes from the drop-down list if you want the selection box to retain its center point when you resize the box by dragging its edges. When you choose No, the opposite side of the selection box will remain anchored when you drag the edges to resize it. |
| Allow movement |
Horizontal: You can move the selection box only horizontally in the workspace. Vertical: You can move the selection box only vertically in the workspace. Unconstrained: You can move the selection box horizontally or vertically in the workspace. |
You can also right-click in the Pan/Crop plug-in to display a shortcut menu that will allow you to quickly adjust the selection box:
|
Item |
Description |
|---|---|
|
Restore |
Returns the crop area to full frame. |
|
Center |
Moves the crop area to the center of the frame. |
|
Flip Horizontal |
Flips the event left to right and backwards. |
|
Flip Vertical |
Flips the event top to bottom and backwards. |
|
Match Output Aspect |
Sets the x,y ratio to match your project properties. |
|
Match Source Aspect |
Sets the x,y value to match the properties of your source media. |
Saving or recalling a keyframe preset
Keyframe presets save the settings of the selected keyframe row at the cursor position.
NOTE Presets for the Position and Mask keyframe rows are saved separately: presets you create in the Position row will not be available in the Mask row.
Saving a preset
-
Adjust your Position or Mask settings as desired to create a keyframe.
-
Type a name in the Preset box.
-
Click the Save Preset button
 .
.
Recalling a preset
-
Click in the Position or Mask keyframe row to select a row and position the cursor where you want to apply the preset.
-
Choose a setting from the Preset drop-down list.
If no keyframe exists at the cursor position, one is created using the settings from the preset. If a keyframe exists at the cursor position, the keyframe's settings are replaced with the settings from the preset.
Deleting a preset
Click the Delete Preset button  to delete the current preset.