Keyframe animation
Keyframes define the state of an effect's settings at a given point in time.
Each keyframe contains a set of parameters for a specified point on the timeline. The settings for intermediate frames are interpolated. Additional keyframes can be added to create more complex effects.
The Keyframe Controller is displayed at the bottom of Video FX, Video Media Generators, Track Motion, and Transition dialogs and is used to add and remove keyframes and control the FX parameters for individual keyframes.
TIP You have to click at least one Animate button  next to the FX parameter control to display the keyframe controller. Some older Video FX have only one Animate button below the FX user interface.

Each effect in a video effects chain can have its own keyframes.
Adding a keyframe
-
In the Keyframe Controller, click to position the cursor where you want to add a keyframe.
-
Click the Insert Keyframe button
 . A keyframe is added to the Keyframe Controller timeline.
The new keyframe's attributes are copied from the previous keyframe to allow you to make subtle changes without recreating all your settings.
TIP To quickly add a keyframe, double-click on the Keyframe Controller timeline, or position the cursor on the timeline and modify your effect parameters.
Removing a keyframe
-
Select a keyframe by clicking it.
-
Click the Delete Keyframe button
 .
.
Navigating between keyframes
To jump to the next or previous keyframe, click the Previous Keyframe  and Next Keyframe
  buttons (or press Ctrl+Left Arrow or Ctrl+Right Arrow).
To jump to the first or last keyframe, click the First Keyframe  or Last Keyframe
  button.
Copying a keyframe
Right-click the keyframe and choose Copy from the shortcut menu. The keyframe and its settings are copied to the clipboard.
TIP Hold the Ctrl key while dragging to copy a keyframe.
Using keyframe animation to modify an effect
Keyframe animation can be used to smoothly and gradually modify an effect. For example, if you wanted to gradually fade an event to black and white, you could use the Black and White effect to create two keyframes. The first keyframe would use the Reset to None preset, and the second keyframe would use the 100% Black and White preset. During playback the event would start playing in color and gradually fade to black and white.
-
Add an effect to an event or track.
 For more information, see Adding video effects
The Video FX window is displayed.
-
Click the Animate button
to display the keyframe controller at the bottom of the window. -
In they keyframe controller, click to position the cursor where you want the effect to start.
TIP Select the Sync Cursor button
 to synchronize the cursor positions on the main timeline and Keyframe Controller timeline.
 -
Click the Insert Keyframe button
. -
Adjust the effect attributes as desired.
-
Repeat steps 3 through 5 to add a keyframe for each effect parameter change.
During playback, the effect will smoothly transition through the attributes you established for each keyframe.
Changing the interpolation curve between keyframes
The interpolation curve determines the rate of animation between two keyframe settings.
For event pan/crop and track motion keyframes, the color of the keyframe indicates which interpolation curve is being used.
|
Command |
Description |
Looks Like |
|---|---|---|
|
Linear
|
Effect parameters are interpolated in a linear path. |
|
|
Fast
|
Effect parameters are interpolated in a fast logarithmic path. |
|
|
Slow
|
Effect parameters are interpolated in a slow logarithmic path. |
|
|
Smooth
|
Effect parameters are interpolated along a smooth, natural curve. |
|
|
Sharp
|
Effect parameters are interpolated along a sharp curve. |
|
|
Hold
|
No animation will take place. The keyframe's settings will be maintained until the next keyframe. |
|


In the Lanes view of the Video FX dialog or in the Pan/Crop or Track Motion dialog, you can right-click a selected keyframe and choose a command from the shortcut menu to change the interpolation curve. The curve type is updated for all selected keyframes.
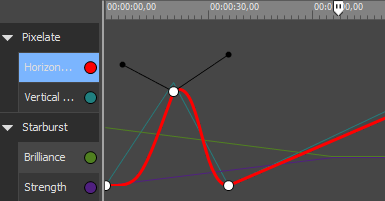
For video effects, the line between keyframes indicates which interpolation curve is being used.
In the Curves view of the Video FX dialog, you can manually adjust a keyframe's spline curves. Click the Lanes/Curves button to toggle between Lanes and Curves views.
Right-click a keyframe and choose Manual from the shortcut menu to display the spline curve handles. Drag the handles to adjust the curve.
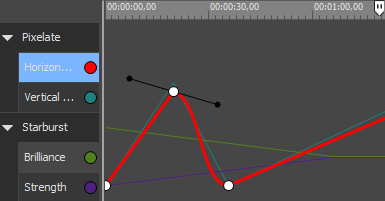
Right-click a keyframe and choose Split Manual from the shortcut menu to independently adjust the curve on each side of the keyframe.
Moving keyframes
After you've set your keyframes, you may need to adjust their positions along the timeline. Drag a keyframe to a new position in the Keyframe Controller timeline to change its position.
Hold Ctrl or Shift while clicking to select multiple keyframes. A selected keyframe is displayed as  , and an unselected keyframe is displayed as a
  .
.
TIP Hold Alt while dragging the first or last keyframe in a group of selected keyframes to adjust their spacing equally.
Adjusting track-level keyframes
If you're using video track effects or track motion, keyframes will be displayed in the timeline below your video track. You can drag keyframes to adjust their position, add and delete keyframes, and change the interpolation curve between keyframes.
TIP Select the Lock Envelopes to Events button  to lock track-level keyframes to the events on the track. When keyframes are locked, you can move events along the timeline, and their associated keyframes move with them.
Click the Expand/Collapse Track Keyframes button  in the track header to toggle the height of the track keyframes. When expanded, a separate row is displayed for each keyframed item.
NOTE Event-level keyframes are not visible in the timeline.
Adding track keyframes
-
Click the Expand/Collapse Track Keyframes button
. -
Double-click to add a keyframe to the track view. The keyframe will use the same settings and interpolation curve as the previous keyframe.
Moving track keyframes
Drag the keyframe to a new position in the timeline. If track keyframe rows are collapsed, overlapping keyframes will move together.
TIP To move multiple keyframes, select the Envelope tool  and create a time selection that includes the keyframes you want to move. When you drag, all keyframes in the time selection will move together.
Changing the interpolation curve between keyframes
The interpolation curve determines the rate of temporal interpolation: the rate of motion between two keyframes. To change the interpolation curve, right-click a keyframe and choose a command from the shortcut menu:
NOTE If you want to adjust spatial interpolation—how motion occurs within a video image—change the Smoothness setting in the Event Pan/Crop or Track Motion dialog. A Smoothness setting of 0 produces linear motion from one keyframe to the next. Increasing the setting produces a curved path. For more information, see Panning and cropping video events and Editing track motion
|
Command |
Description |
Looks Like |
|---|---|---|
|
Hold
|
No animation will take place. The keyframe's settings will be maintained until the next keyframe. |
|
|
Linear
|
Effect parameters are interpolated in a linear path. |
|
|
Fast
|
Effect parameters are interpolated in a fast logarithmic path. |
|
|
Slow
|
Effect parameters are interpolated in a slow logarithmic path. |
|
|
Smooth
|
Effect parameters are interpolated along a smooth, natural curve. |
|
Editing track keyframes
Individual keyframe parameters cannot be adjusted in the track view. To edit a keyframe, open the effect's property page.
-
Click the Expand/Collapse Track Keyframes button
to expand track keyframe rows. -
Double-click a keyframe to open its property page. For more information about using an effect, see Adding video effects