Editing track motion
From the Tools menu, choose Video, and choose Track Motion from the submenu (or click the Track Motion button  on a track header) to display the Track Motion window.
The Track Motion window is used to move a video track over another track. In the following example, a picture-in-picture window has been created by resizing and positioning the overlay video clip. Motion was used to gradually move the text up from the bottom of the window.

Zooming or panning a video track
When you use a single setting for the track, you move all video on the track. When you add keyframes to change track motion settings through the duration of the track, you can create animation.  For more information, see Keyframe animation
-
Click the Track Motion button
on the track that contains the overlay you want to animate. The Track Motion window is displayed. -
Choose a setting from the Composite Mode drop-down list to specify how your track will be composited over other tracks.
For more information, see Compositing and masks -
Adjust the selection area to change the viewable area of the track and its position. You can use the Position, Orientation, and Rotation controls on the left side of the window, or you can drag the selection box in the workspace. When you drag, guides are displayed in bold to indicate how the track will be moved or rotated:
Moving closer to or farther from viewer. Drag across corners to flip the track.
Dragging the track to change its position.
Rotating around the Z axis
-
Use the buttons at the top of the dialog to allow or prevent movement or scaling. See the Change editing options heading in this topic for more information.
TIP Right-click the workspace to display a shortcut menu that displays commands to restore, center, or flip the selection box. You can also force the box to match the source media's aspect ratio, your project's output aspect ratio, or a square aspect. Matching the output aspect ratio can prevent black bars from appearing when you use source media (such as photographs) that does not match your project's aspect ratio.
The track motion occurs instantly, and the results are updated in the Video Preview window.
-
Use the keyframe controller at the bottom of the Track Motion window to establish distinct track motion settings throughout the duration of the track.
During playback, intermediate frames are interpolated to create smooth motion.
Expand the Keyframe interpolation heading on the left side of the window and drag the Smoothness slider to adjust the interpolation.
TIP Use the Default Track Motion smoothness control on the External Control & Automation tab of the Preferences dialog to set the default Smoothness value for new keyframes.
Creating a shadow effect
The shadow effect creates a drop shadow under an object, window, or title. A shadow is especially effective under a picture-in-picture window.
This procedure assumes that you have already created an event on the track above the background video to be used as an overlay.
-
Click the Track Motion button
on the track where you want to add a shadow effect. The Track Motion window is displayed. -
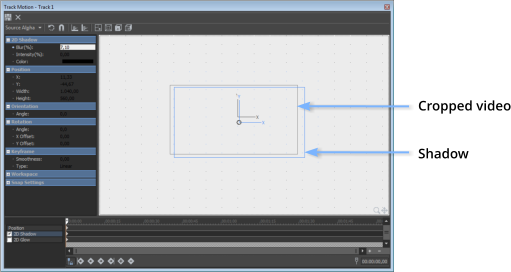
Select the 2D Shadow row in the keyframe controller. When the 2D Shadow row is selected, shadow controls are displayed in the Track Motion dialog.
Select the 2D Shadow checkbox to apply the shadow so you can see the results of your shadow in the Video Preview window, or clear the checkbox to bypass the shadow.

-
Use the 2D Shadow controls on the left side of the window to set the color and appearance of the shadow:
-
Adjust the size position of the shadow by dragging the box in the workspace or using the Position, Orientation, and Rotation controls on the left side of the window. For more information about manipulating the selection box, see Crop, zoom, or pan a video track in this section.
-
To animate the shadow, click in the 2D Shadow row of the Keyframe Controller to set the cursor to a later time and adjust the shadow settings.
You can use keyframe animation to change the color or transparency of the shadow, or you can move the shadow independently of the overlay video.
For more information, see Keyframe animation
|
Item |
Description |
|---|---|
| Blur % |
Type a number in the box or click the |
| Intensity |
Type a number in the box or click the |
| Color |
Click the down arrow next to the color swatch to display a color picker. Use the sliders or edit boxes in the color picker to set the shadow color, or use the eyedropper tool |
Creating a glow effect
A glow is similar to a shadow, but is typically a bright color with feathered edges.
This procedure assumes that you have already created an event on the track above the background video to be used as an overlay.
-
Click the Track Motion button
on the track where you want to add a shadow effect. The Track Motion window is displayed. -
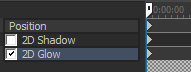
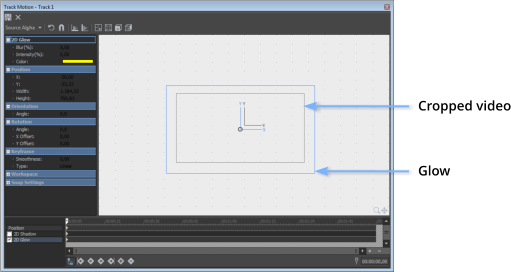
Select the 2D Glow row in the keyframe controller. When the 2D Glow row is selected, glow controls are displayed in the Track Motion dialog.
Select the 2D Glow checkbox to apply the shadow so you can see the results of the glow effect in the Video Preview window, or clear the checkbox to bypass the glow.
-
Use the 2D Glow controls on the left side of the window to set the color and appearance of the glow:
Item
Description
Blur % Type a number in the box or click the
 button to display a slider you can use to soften the edge of the glow effect. Set to 0 for a hard edge, or increase the setting to feather the edge of the glow.
Intensity Type a number in the box or click the
button to display a slider you can use to establish the transparency of the glow's blurred edge. Decrease the setting for a translucent glow, or increase the setting for a more opaque glow.Color Click the down arrow next to the color swatch to display a color picker. Use the sliders or edit boxes in the color picker to set the glow color, or use the eyedropper tool
 to sample a color from your screen.
 -
Adjust the size position of the glow by dragging the box in the workspace or using the Position, Orientation, and Rotation controls on the left side of the window. For more information about manipulating the selection box, see Crop, zoom, or pan a video track in this section.
-
To animate the glow, click in the 2D Glow row of the Keyframe Controller to set the cursor to a later time and adjust the glow settings.
You can use keyframe animation to change the color or transparency of the glow, or you can move the glow independently of the overlay video.
For more information, see Keyframe animation
Moving a group of composited tracks (applying parent motion)
-
Click the Make Compositing Child button
 on the tracks you want to group to create a compositing group.
If you want to move the compositing group in the 3D space, click the Parent Composite Mode button
 on the parent track and choose 3D Source Alpha. For more information, see Compositing and masks and 3D compositing
 -
Click the Parent Motion button
on the parent track. The Track Motion window is displayed.
-
Choose a setting from the Composite Mode drop-down list to specify how your tracks will be composited over other tracks.
-
Perform the procedures described earlier in this topic to crop or zoom the composited tracks, change their position on screen, or add shadow or glow effects.
-
If you want to create animated track motion, use the keyframe controller at the bottom of the Track Motion window to establish distinct zoom settings throughout the duration of the track.
During playback, intermediate frames are interpolated to create smooth motion.
For more information, see Keyframe animation
|
Parent track motion is applied to the parent track and all child tracks. In the sample track list, parent track motion on track 1 will affect tracks 1 through 6. Parent track motion applied to track 4 will affect only tracks 4 through 6. |
|
Changing editing options
Use the toolbar at the top of the Track Motion window to change your editing options:
|
Item |
Description |
|
|---|---|---|
|
|
Enable Rotation |
Select this button if you want to be able to rotate, or spin, the video. When the button is not selected, video is locked so you can move it horizontally or vertically, but the track cannot be rotated. |
|
|
Enable Snapping to Grid |
Select this button if you want your editing to snap to the grid. |
|
|
Edit in Object Space |
Select this button if you want to edit in the object's space rather than the camera's space. For example, if a video object is rotated, its X axis may not correspond to the X axis of the of the Video Preview window. Selecting the Edit in Object Space button in conjunction with the Prevent Movement buttons allows you to move the object along its own X and Y axes. |
|
|
Prevent Movement (X) |
Select this button if you want to prevent horizontal movement of the track. |
|
|
Prevent Movement (Y) |
Select this button if you want to prevent vertical movement of the track. |
|
|
Lock Aspect Ratio |
Select this button if you want the selection box to retain its aspect ratio during resizing. When the button is not selected, the height and width can be resized independently. |
|
|
Scale About Center |
Select this button if you want the selection box to retain its center point when you resize the box by dragging its edges. When the button is not selected, the opposite side of the selection box will remain anchored when you drag the edges to resize it. |
|
|
Prevent Scaling (X) |
Select this button if you want to lock the horizontal dimension of the selection box. |
|
|
Prevent Scaling (Y) |
Select this button if you want to lock the vertical dimension of the selection box. |


Saving or recalling a keyframe preset
Keyframe presets save the settings of the selected keyframe row at the cursor position.
-
Presets for the Position, 2D Shadow, and 2D Glow keyframe rows are saved separately.
-
Presets for 2D and 3D track motion are saved separately: presets you create in this window will not be available in the 3D Track Motion window.
For more information, see 3D compositing
Saving a preset
-
Adjust your Position, 2D Shadow, or 2D Glow settings as desired to create a keyframe.
-
Type a name in the Preset box.
-
Click the Save Preset button
 .
.
Recalling a preset
-
Click in the Position, 2D Shadow, and 2D Glow keyframe row to select a row and position the cursor where you want to apply the preset.
-
Choose a setting from the Preset drop-down list.
If no keyframe exists at the cursor position, one is created using the settings from the preset. If a keyframe exists at the cursor position, the keyframe's settings are replaced with the settings from the preset.
Deleting a preset
Click the Delete Preset button  to delete the current preset.