Compositing and masks
Compositing is the process of mixing video tracks to create a single layered output.
You can use compositing in conjunction with masks to cover portions of video or to limit the effects of a filter. Masks are frequently based on dark versus light areas, specific colors, or an alpha channel.
Click the Parent Composite Mode or Compositing Mode button  in the track header and choose a mode from the menu to determine how the transparency in a video track is generated. Since lower tracks show through higher tracks, it is the compositing mode of the higher track that determines how much of the lower track shows though. The compositing mode of the lowest video track adjusts its transparency against the background.
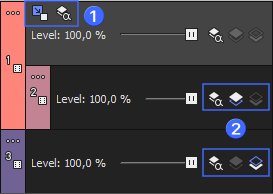
| 1 | Parent Composite Mode |
| 2 |
Compositing Mode |
To change the opacity/transparency of all events on the track, drag the Level slider in the track header or use a composite-level envelope to adjust the opacity/transparency over time.
 For more information, see Video track controls and Video track automation
To change the opacity/transparency of a single event, you can use an event envelope.
For more information, see Event envelopes
Parent and child tracks
The key to understanding overlays, masks, transparency, and compositing is to understand the parent/child relationship between tracks. In general terms, the parent track is the highest track in a group of tracks (often only two) and the behavior of the child tracks (i.e. how they are composited together) is determined by the parent track.
-
Click the Make Compositing Child button
 on a parent track to make a child track.
 -
Click the Make Compositing Parent button
 on a child track to make a parent track.
In this first example, there are three tracks. Track one contains a mask. The circular region in the mask is transparent, so the second track shows through. The third track is also a child, so it is displayed behind track two.
In this example, the third track is also a parent, so it is displayed behind the composite of tracks one and two.
You can also produce complex compositing by creating nested parent/child groups with compositing parents and children at various levels.
When you have multiple levels of parent and child tracks, clicking the Make Compositing Child button moves the track in one level and clicking the Make Compositing Parent button moves out one level.
Hold Ctrl while clicking the Make Compositing Child button to move a track and all its child tracks in one level.
For examples of how parent/child track relationships affect 3D compositing, see 3D compositing
Compositing modes and transparency
The Compositing Mode button determines how the transparency in a video track is generated. Because lower tracks show through higher tracks, it is the compositing mode of the higher track that determines how much of the lower track shows though. The compositing mode of the lowest video track adjusts its transparency against the background.
The mode can be selected by clicking the Compositing Mode button and choosing a mode from the menu.
The following examples demonstrate how each of the compositing modes would affect two simple tracks. Track one is a generated media event with a transparent edge, and track two is a DV clip.
|
Mode |
Description |
Example |
|---|---|---|
|
Merges the colors of the tracks. |
|
|
|
Uses the alpha channel to determine transparency. NOTE The compositing mode is based on the alpha channel characteristics of an event or media file. If no alpha channel is present, the Source Alpha mode has no effect. |
|
|
|
Combines the color values in the composite group. |
|
|
|
Subtracts the overlay color values from the background. |
|
|
|
Cuts out the overlay color values from the background. |
|
|
|
Multiplies the inverse of the overlay color values with the background color values. This makes overlay colors weaker and less present and results in a lighter video image. The opposite of this mode is Multiply. |
|
|
|
Heightens contrast by using Multiply mode on darker colors and Screen mode on lighter colors. |
|
|
|
Adds overlay colors as if the overlay were lit by a bright, focused spotlight. |
|
|
|
Brightens the background based on the overlay color values. |
|
|
|
Darkens the background based on the overlay color values. |
|
|
|
Compares the overlay and background pixel by pixel and selects the darker color value for each pixel. |
|
|
|
Compares the overlay and background pixel by pixel and selects the lighter color value for each pixel. |
|
|
|
Compares the overlay and background pixel by pixel and subtracts the darker color value from the lighter color to generate a new color value. |
|
|
|
Remaps color values along a parabolic curve. The color values of the layers in the composite group are subtracted, and then the subtracted values are squared. The resulting image will have less extreme changes in color values as the colors approach black (RGB 0,0,0) and more extreme changes in color values as colors approach white (RGB 255,255,255). |
|


Drag the Level slider in a video track to control the transparency or blending of each track. Left is 100% transparent and right is 100% opaque. You can also double-click the percent to enter a specific numeric percentage.
Using a 2-to-1 transform plug-in for custom compositing
When you click the Parent Composite Mode or Compositing Mode button and choose Custom from the menu, you can use plug-ins to customize compositing.
The included Displacement Map, Height Map, and Bump Map plug-ins can create interesting lens, mirror, water, fire, and other light-bending effects.
|
Plug-In |
Description |
|---|---|
|
Displacement Map |
Uses the parent image as a guide to offset the pixels in the composited child tracks along the horizontal and vertical axes. The X and Y offsets are independently encoded in the image color channels.
|
|
Height Map |
Uses the parent image as a guide to make the pixels in the composited child tracks appear closer to or farther away from the viewer. The gradient of the image in the parent track is used to determine the amount of offset for the image displayed at that location, in much the same way light bends through a lens.
|
|
Bump Map |
Uses the parent image as a guide to add texture and lighting to the composited child tracks. The texture of the bump map is applied to the composited child tracks: light sections of the map represent high areas, and dark sections represent low areas.
|
Compositor Window
The default compositing mode for a video track is Source Alpha mode.
When you apply a compositing plug-in effect (like the three mentioned above) from the Compositor window, the track will automatically switch to Custom compositing mode. The advantage of adding a compositing plug-in using the Compositor window is efficiency. When adding a compositor, such as Bump Map, as a custom mode, using the Compositor window, the "effect" applies to any and all tracks below. To accomplish the same thing with a regular effect, you'd need to specifically add bump-map to each of the tracks below one-by-one. If you later add another track below, you'd have to remember to add the bump-map effect to that track.
Creating a mask
-
If you have not already done so, place and position the image or video you want to use as a mask on the top-level track in your project.
For more information, see Adding media files to your project -
Place video files on the tracks below the mask.
-
Ensure your mask is a compositing parent the tracks below are child tracks.
-
Click the Compositing Mode button
on the mask track and choose Multiply (Mask) from the menu.If your mask image is grayscale, you're done. If not, continue with Step 5.
-
Add the Mask Generator plug-in as a track effect on the mask track and adjust the controls as needed to set transparency in the mask track.
For more information, see "Mask Generator."TIP You can also use the Event Pan/Crop dialog to create event-level Bézier masks.
For more information, see Panning and cropping video eventsTIP Like the Crop OFX is a replacement for the Panning and Cropping window with interactive adjustment directly on the video preview window, there's also a new Bézier Masking OFX. You can create up to five regular formed or Bézier masks in a video track or event. You can also mask an effect from the same effect chain the Bézier Masking OFX is included in, and you can track the content of the video and move and scale the mask according the content under it.
FIGURE Solid-color mask
FIGURE Gradient mask