Event envelopes
You can apply envelopes to audio and video events to change settings over time:
-
Audio event envelopes allow you to control an event's fade-in, fade-out, and overall level.
-
Video event envelopes allow you to control an event's fade-in, fade-out, opacity, and velocity.
NOTE An envelope is specific to the track upon which it is applied. Event-specific envelopes will be calculated after the track fader.
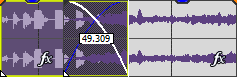
Select Event Fade Lengths from the View menu if you want to display fade lengths in selected events:
Adjusting an audio event's volume
-
Hover over the top of an audio event.
-
When you see the envelope cursor (
 ), drag the volume line to the desired level. As you drag the line, the event’s gain is displayed in dB.
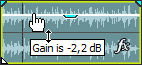 TIP
TIP-
Hold Ctrl(or hold the right mouse button) while dragging the sustain portion of the envelope to adjust the value in fine increments.
-
When you have multiple events selected, the gain of all selected events is adjusted simultaneously.
-
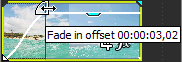
Fading an audio event in or out
-
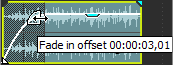
Hover over upper-left or upper-right corner of an audio event until the cursor is displayed as a
 .
.NOTE Fades between overlapping events cannot be adjusted when automatic crossfades are enabled.
 For more information, see Automatic crossfades
 -
Click the corner of the event and drag to create a fade.
To remove a fade, drag the end of the fade curve back to the edge of the event.
TIP When you have multiple events selected, the fade of all selected events is adjusted simultaneously.
Adjusting a video event's opacity
Opacity envelopes adjust the transparency of an event, allowing it to fade in over a background. This background can be another video event or a background color.
For more information about compositing, see Compositing and masks
-
Hover over the top of a video event.
-
When you see the envelope cursor (
), drag the opacity line to the desired level. As you drag the line, the event’s opacity is displayed as a percentage. As opacity decreases, the event becomes more transparent.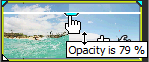 TIP
TIP-
Hold Ctrl(or hold the right mouse button) while dragging to adjust the envelope in fine increments.
-
When you have multiple events selected, the opacity of all selected events is adjusted simultaneously.
-
Fading a video event in or out
You can adjust the opacity at the beginning and end of a video event to fade in or out over a background. This background can be another video event or a background color.
For more information about compositing, see Compositing and masks
-
Hover over upper-left or upper-right corner of a video event until the cursor is displayed as a
.NOTE Fades between overlapping events cannot be adjusted when automatic crossfades are enabled.
For more information, see Automatic crossfades -
Click the corner of the event and drag to create a fade.
To remove a fade, drag the end of the fade curve back to the edge of the event.
TIP When you have multiple events selected, the fade of all selected events is adjusted simultaneously.
Adjusting a video event's velocity
Velocity envelopes are used to change the speed of a video event over time. For example, you could use a velocity envelope to play a clip in slow motion.
Each video event in your project has a specific duration that is not changed by velocity envelopes. Therefore, if you decrease the speed of a ten-second video event by 50%, only five seconds of video will be shown. On the other hand, if the speed is increased 200%, the ten seconds of video will play in only five seconds. The remaining five seconds of the event will be filled either with a freeze of the last frame or with ten additional seconds of video content from the media file.
-
Right-click a video event, choose Insert/Remove Envelope from the shortcut menu, and then choose Velocity from the submenu. A velocity envelope is drawn on the event.
-
Drag the envelope up to increase the playback speed of the event, or drag down to decrease its speed.
TIP-
Right-click an envelope point and choose a command from the shortcut menu to choose from velocity presets from 100% reverse-speed playback to 0% playback (a freeze-frame effect) up to 300% (triple-speed) playback.
-
Setting a velocity envelope to a negative value will cause the event to play in reverse. Video events can only be reversed if there is media to reverse: an event cannot be reversed past the beginning of a media file. An event that has been reversed will play backward until it gets to the first frame and will then hold that frame for the duration of the event.
-
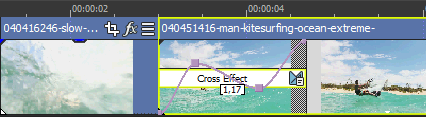
Adding a transition progress envelope
Normally, a transition progresses from 0 to 100% in a linear fashion over the length of the transition. A transition progress envelope gives you complete control over a transition: you can hold, reverse, and repeat individual transitions.
-
Select a transition.
-
From the Insert menu, choose Video Envelopes, and then choose Transition Progress from the submenu. An envelope is added to your transition.
-
Add points and adjust the fade curves as desired.
For more information, see Adjusting envelopesIn the following example, the transition starts, progresses to 50%, reverses direction, and then finishes.
Changing the fade curve type
-
Hover over the edge of a fade until the cursor is displayed as a
, or hover over an envelope segment. -
Right-click to display the Fade Types shortcut menu, and choose a fade type to set the speed of the fade.