Video track controls
The controls in the track list allow you to adjust track motion, effects, opacity, and compositing.

NOTE If you cannot find a trace control mentioned here, it's probably hidden. Click the More button  to specify which track control should be visible in the track header.
Changing a track's color
You can change the color of your tracks to create logical track groups.
To change a track's color, right-click the header and choose Track Display Color from the shortcut menu. Choose a color from the submenu to change the icon in the Track List and the color that is used to highlight a selected event in the timeline.
Use the Display tab in the Preferences dialog to edit the available colors.  For more information, see Preferences - Display Tab
Changing a track's height
Drag a track's bottom border to set its height. If you want to set a track's height as the default height for new tracks, you can right-click within the track list and choose Set Default Track Properties from the shortcut menu. For more information, see Setting default track properties
Click Minimize  to minimize a track vertically.
Click Maximize  to zoom in vertically so a track fills the timeline.
After minimizing or maximizing a track, click the Minimize or Maximize button again to return a track to its previous height.
Track height keyboard shortcuts
-
Press Ctrl + Shift + ↑ (Up Arrow) or ↓ (Down Arrow) to change the height of all tracks at once.
-
Press ` to minimize all tracks. Press again to restore tracks to their previous height. When restoring track height, tracks that you previously minimized are not restored—you can restore these tracks by clicking the Restore Track Height button
 on the track header.
 -
Press Ctrl + ` to return all tracks to the default height.
Expanding or collapsing track layers
Right-click the track header and choose Expand Track Layers to expand a video track to reveal three subtracks within the main track: the A roll, B roll, and transition roll. In this view, sequential clips alternate between the A and B rolls, and the overlapping area between events is represented by the transition roll.
Choose the command again to collapse the track layers.
For more information, see Adding transitions
Expanding or collapsing track keyframes
If you're using video track effects or track motion, keyframes will be displayed in the timeline below your video track. You can drag keyframes to adjust their position, or right-click a keyframe to display a shortcut menu that allows you to add and delete keyframes and change the interpolation curve between keyframes.
For more information, see Adding video effects and Editing track motion
TIP Select the Lock Envelopes to Events button  to lock track-level keyframes to the events on the track. When keyframes are locked, you can move events along the timeline, and their associated keyframes move with them.
Click the Expand/Collapse Track Keyframes button  in the track header to toggle the height of the track keyframes.
NOTE Event-level keyframes are not visible in the timeline.
Assigning a name to a track
-
Double-click in the Scribble Strip
 and type the track name.
If you do not see the Scribble Strip, expand the track to reveal it. The Scribble Strip appears above the Level fader.

-
Press Enter to save the name.
Bypassing the motion blur envelope
If you've applied a motion blur envelope to the video bus track, the envelope affects all tracks. To bypass motion blur for a track, select the Bypass Motion Blur button  in the track header.
For more information, see Video bus track
Applying track motion
Click the Track Motion button  to display the Track Motion window.
You can use this window to animate a video track or create picture-in-picture effects.
For more information, see Editing track motion
Applying effects to a track
Click the Track FX button  to add or edit track-level video effects. Track effects are applied to every event on the selected track.
For more information, see Adding video effects
Muting a track
Click the Mute button  to prevent a track from being played in the mix. Click the Mute button on additional tracks to add them to the mute group. To unmute a track, click the Mute button again.
TIP When you have a group of tracks muted, hold Ctrl while clicking the Mute button on an unmuted track to remove all other tracks from the mute group. Hold Ctrl while clicking the Mute button on a muted track to reset all Mutebuttons.
Muting or unmuting a track
-
Deselect the Automation Settings button
 .
. -
Click the Mute button
.
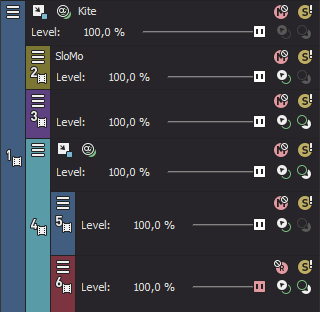
When you have multiple levels of parent and child tracks, clicking the Mute button on a parent track mutes the parent track and its compositing children.
In the sample track list, muting track 1 will mute tracks 1 through 6.
Muting track 4 will mute tracks 4 through 6.
For more information, see Compositing and masks
Adjusting mute automation
You can edit mute automation settings by adding a mute envelope to the track or by using the controls in the track header.
-
Select the Automation Settings button
. The Mute button is displayed as  .
. -
Click the Mute button
to change the track's mute automation state.The button behaves differently if the track has a mute envelope and when you change the track automation recording mode:
-
When the track automation mode is set to Off, the button mutes the entire track.
-
When the track has a mute envelope and the track automation mode is set to Read, the button changes state to reflect the envelope setting during playback but cannot be adjusted.
-
When the track has a mute envelope and the track automation mode is set to Touch or Latch, the button edits the envelope setting at the cursor position.
For more information, see Recording track envelope and keyframe automation andVideo track automation
Soloing a track
Select the Solo button  to mute all unselected tracks. Click the Solo button on additional tracks to add them to the solo group. To remove a track from the solo group, click the Solo button again.
TIP When you have a group of tracks soloed, hold Ctrl while clicking the Solo button on an unsoloed track to remove all other tracks from the solo group. Hold Ctrl while clicking the Solo button on a soloed track reset all Solo buttons.
When you have multiple levels of parentand child tracks, clicking the Solo button ona parent track solos the parent track and its compositing children. Othernonsoloed tracks at the same compositing level are bypassed.
In the sample track list, soloing track 1 will solo tracks 1 through6.
Soloing track 4 will solo tracks 4 through 6. Tracks 2 and 3 are bypassed,and tracks 1 and 7 play normally.
For more information, see Compositing and masks
Adjusting track opacity and trim levels
The Level slider in the track header affects the composite level of a track. The slider can function as a trim control that adjusts the overall track opacity, or it can adjust track opacity automation settings.
The trim level is added to the track automation settings so your envelope is preserved, but with a boost or cut applied. For example, setting the trim control to 90% has the same effect as decreasing every envelope point by 10%.
Click the Parent Composite Mode or Compositing Mode button  and choose a mode from the menu to determine how the transparency in a video track is generated. Since lower tracks show through higher tracks, it is the compositing mode of the higher track that determines how much of the lower track shows though. The compositing mode of the lowest video track adjusts its transparency against the background.
For more information, see Video track automation and Compositing and masks
Adjusting the compositing trim level
-
Deselect the Automation Settings button
. -
Drag the Level slider to control the transparency or blending of each track: left is 100% transparent, and right is 100% opaque.
You can hold Ctrl while dragging the slider to adjust the setting in finer increments, or double-click the slider to return it to 100% opaque.
If multiple tracks are selected, all selected tracks are adjusted.
Adjusting the composite automation level
You can edit automation settings by adding a composite level envelope to the track or by using the controls in the track header.
-
Select the Automation Settings button
. The slider thumb is displayed as a  in automation mode.
 -
Drag the Level slider.
The slider behaves differently if the track has a composite level envelope and when you change the track automation recording mode:
-
When the track automation mode is set to Off, the slider adjusts the composite level of the entire track.
-
When the track has a composite level envelope and the track automation mode is set to Read, the slider will follow the envelope during playback but cannot be adjusted.
-
When the track automation mode is set to Touch or Latch, the slider edits the envelope setting at the cursor position. If the track does not have a composite level envelope, an envelope will be added when you adjust the slider.
If multiple tracks are selected, all selected tracks are adjusted.
For more information, see Recording track envelope and keyframe automationVideo track automation
Adjusting track fade-to-color levels
You can edit automation settings by adding a fade-to-color envelope to the track or by using the controls in the track header. The Fade slider is displayed only when the Automation Settings button is selected.
TIP You can set the track fade colors for each video track independently by right-clicking the track header, choosing Fade Colors, and then choosing Top or Bottom from the submenu. If you want to change the default fade colors, use the Track fade top and Track fade bottom controls on the Video tab of the Preferences dialog.
-
Select the Automation Settings button
. The slider thumb is displayed as a in automation mode. -
Drag the Fade slider.
The slider behaves differently when you change the track automation recording mode:
-
When the track automation mode is set to Off, the slider adjusts the fade level of the entire track.
-
When the track automation mode is set to Read, the slider will follow the envelope during playback but cannot be adjusted.
-
When the track automation mode is set to Touch or Latch, the slider edits the envelope setting at the cursor position.
If multiple tracks are selected, all selected tracks are adjusted.
For more information, see Recording track envelope and keyframe automationVideo track automation