Video bus track
From the View menu, choose Video Bus Track to toggle the display of the video bus track at the bottom of the timeline. A single bus track exists as a timeline representation of the main video output.
You can use the bus track to animate video output effects using keyframes, add motion blur envelopes, or video supersampling envelopes.
Adding keyframes to the video bus track
Adding keyframes to the video bus track is just like working with any other video track. Use video bus track keyframes to animate video output effects. For more information, see Keyframe animation and Adding video effects
Adding a fade-to color envelope
You can add fade-to-color, motion blur amount, and video supersampling envelopes to the video bus track to affect your video output.
Adding and editing a fade-to-color envelope is just like adding an envelope on a standard video track, but it affects all tracks. For more information, see Video track automation
Adding a motion blur envelope
Motion blur can help you make computer-generated animation look more realistic. For example, if you use track motion or event pan/crop to move a clip across the frame, each frame is displayed clearly when no motion blur is applied. Turning on motion blur adds a motion-dependent blur to each frame to create the appearance of smooth motion in the same way a fast-moving subject is blurred when you take a photograph with a slow shutter speed.

Panned event frame without motion blur

Frame with motion blur
-
Right-click the video bus track, choose Insert/Remove Envelope from the shortcut menu, and then choose Motion Blur Amount from the submenu.
-
Edit motion blur automation settings:
-
Add and adjust envelope points as necessary to set the time interval that will be used for blurring. For more information, see Adjusting envelopes Increasing the value emphasizes the blur effect. For example, setting the envelope to 0 means no blurring will occur; setting the envelope to 1 second means that each frame will be blurred for one-half second before and after the frame.
—or—
-
Select the Automation Settings button
 . The Motion Blur slider handle is displayed as a
  .
.The Motion Blur slider behaves differently if the track has a composite level envelope and when you change the track automation recording mode:
-
When the track automation mode is set to Off, the slider adjusts the motion blur level of the entire track.
-
When the track has a motion blur envelope and the track automation mode is set to Read, the slider will follow the envelope during playback but cannot be adjusted.
-
When the track automation mode is set to Touch or Latch, the slider edits the envelope setting at the cursor position. If the track does not have a motion blur envelope, an envelope will be added when you adjust the slider.
-
The motion blur envelope affects all tracks. To bypass motion blur for a track, select the Bypass Motion Blur button
 in the track header.
 -
To change blur type, choose a setting from the Motion blur type drop-down list on the Video tab in the Project Properties dialog. This setting determines the shape of the blur and the opacity of the frames. For more information, see Setting project properties
IMPORTANT Adding a motion blur envelope significantly increases your rendering time.
Adding a video supersampling envelope
Video supersampling can improve the appearance of computer-generated animation by calculating intermediate frames between the project's frame rate, allowing you to create smoother motion blurring or motion from sources such as track motion, event pan/crop, transitions, or keyframable effects.
NOTE The effect of video supersampling is less apparent with video that contains fast motion, and supersampling cannot improve the appearance of existing video.
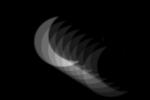
Motion blur without supersampling—multiple exposures are visible

Motion blur with supersampling—multiple exposures appear smoother
-
Right-click the video bus track, choose Insert/Remove Envelope from the shortcut menu, and then choose Video Supersampling from the submenu.
-
Edit automation settings:
-
Add and adjust envelope points as necessary to indicate how many frames will be calculated between frames (using the project's frame rate) to create the blur.
—or—
-
Select the Automation Settings button
. The Supersampling slider handle is displayed as a .The Supersampling slider behaves differently if the track has a supersampling envelope and when you change the track automation recording mode:
-
When the track automation mode is set to Off, the slider adjusts the supersampling level of the entire track.
-
When the track has a supersampling envelope and the track automation mode is set to Read, the slider will follow the envelope during playback but cannot be adjusted.
-
When the track automation mode is set to Touch or Latch, the slider edits the envelope setting at the cursor position. If the track does not have a supersampling envelope, an envelope will be added when you adjust the slider.
IMPORTANT Video supersampling significantly increases your rendering time. For example, when you set the video supersampling envelope to 2, twice as many frames are rendered than would be rendered without supersampling. Adjust the envelope to apply supersampling only where necessary.
Adding effects to a bus track
Click the Video Output FX button  in the bus track header to add or edit video output effects. If there are no video output effects, clicking this button displays the Plug-In Chooser. If you've already set up video output effects, clicking the button displays the Video Output FX window. For more information, see Adding video effects
Muting the video output
Click the Mute button  to mute the video output. To unmute the video output, click the Mute button again.
Muting or unmuting a bus track
-
Deselect the Automation Settings button
. -
Click the Mute button
.
Adjusting mute automation
You can edit mute automation settings by adding a mute envelope to the track or by using the controls in the track header.
-
Select the Automation Settings button
. The Mute button is displayed as  .
. -
Click the Mute button
to change the bus track's mute automation state.The button behaves differently if the track has a mute envelope and when you change the track automation recording mode:
-
When the track automation mode is set to Off, the button mutes the entire track.
-
When the track has a mute envelope and the track automation mode is set to Read, the button changes state to reflect the envelope setting during playback but cannot be adjusted.
-
When the track has a mute envelope and the track automation mode is set to Touch or Latch, the button edits the envelope setting at the cursor position.
Bypassing video effects and envelopes
Click the Bypass FX and Envelopes button  in the bus track header to bypass all video output effects and bus track envelopes.
Resizing bus tracks
You can drag the horizontal splitter between the track list and bus tracks to increase or decrease the space allocated to bus tracks. Perform any of the following actions to resize individual bus tracks:
-
Drag a bus track's bottom border to set its height.
-
Click Minimize
 to minimize a track vertically.
 -
Click Maximize
 to zoom in vertically so a bus track fills the lower portion of the timeline.
 -
After minimizing or maximizing a bus track, click the Minimize or Maximize button again to return a bus track to its previous height.
-
Press Ctrl+Shift+Up/Down Arrow when the bus track area has focus to resize all bus tracks at once.