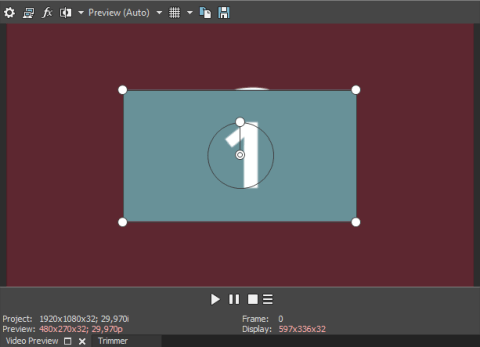
Creating a Picture-in-Picture Effect
There are two ways of creating a picture-in-picture effect; use Track Motion or use the Picture-in-Picture plug-in. To learn how to create this composite using Track Motion see "Editing track motion". Using the picture-in-picture plug-in is more flexible and has the added advantage of being able to apply it to a single event, rather than the whole timeline, and adjust the parameters, such as placement, size, and rotation, directly on the Preview window.
For this example, we will create a simple two-video PiP project.
-
Create a new project file.
-
Add two media clips to your project. See Adding media files to your project. The video that you want to display as a picture over a background picture should be on the top track. The background picture should be on the lower track.

There are several ways you can add a video effect to the track or to an event. SeeAdding video effects. For this example, we’ll use drag and drop.
-
Open the video effect widow, expand the OFX folder and choose the Picture-in-Picture effect.
-
To apply the effect to the track; drag the effect to the track header.
-
To apply the effect to an event; drag the effect to the event.
You now see the top video in the default PiP positioned in the middle of the preview window.

-
-
There are two different methods for changing the location of the PiP; using the controls in the Video FX window or by manipulating it directly in the Preview window.
- In the video FX window click the arrow to the left of Location
- Click and drag the position control
 to reposition the PiP window.
 - You can also type specific coordinates into the Location text box
- Click and drag anywhere inside the PiP window in the preview window. When you are in window-move mode the border will turn green.
Using the Video FX window:
Using the Preview window:
-
There are two different methods for changing the size of the PiP; using the controls in the Video FX window or by manipulating it directly in the Preview window.
- Drag the Scale slider or type a specific number into the Scale text box.
- When the Video FX window is open adjustment handles are located on each corner and on the edges of the PiP window. These handles enable you to change the size of the PiP window. When you access these handles the borders turn red.
- Position your mouse over one of the adjustment handles. The mouse changes to a 4-way pointing arrow. Click and drag a corner adjustment handle to resize while maintaining the aspect ratio.
Using the Video FX window:
Using the Preview window:
-
You can also adjust the angle of the PiP using either the Video FX window or the Preview window
- Move the Angle slider or type a specific number into the Angle text box.
- Point your mouse anywhere along the circle inside the PiP window and your mouse will change to a curving arrow. Click and drag the circle. The control borders will change to the color purple.
- To adjust the Opacity of the Pip, drag the Opacity slider in the Video FX window or type a specific number into the Opacity text box.
To adjust the angle using the Video FX window:
To adjust the angle using the Video Preview window:
You can animate the location, scale, angle, and opacity of the PiP window, changing it over time, by using Keyframes. See Keyframe animation.