Recording audio
VEGAS Pro can record audio into multiple mono or stereo tracks while simultaneously playing back existing audio and video tracks. You are limited only by the performance of your computer system and audio hardware. Audio is recorded to a media file on your computer and into an event on the timeline.
You can record into an empty track, a time selection, an event, or a combination of time and event selection. You can also record multiple takes for an event so you can maintain multiple versions of an event that you can play back and edit.
-
Select a media bin before recording if you want to automatically add your recorded audio to a media bin.
 For more information, see Sorting your media with bins
 -
To save track effects with your recorded files, create an effects package of the track effect settings and apply the chain to the event as a non-real time event effect.
For more information, see Sorting your media with bins and Applying non-real-time event effects -
Press Alt+Down Arrow during playback to move the edit cursor to the playback cursor.
-
When the Record Broadcast Wave Format checkbox is selected on the Audio tab of the Preferences dialog, VEGAS Pro records Broadcast Wave Format (.bwf) metadata when recording .wav files. You can view this information on the General tab of the Properties dialog for an event.
Included in the .bwf metadata is a Time reference value. This item tracks where on the timeline the file was recorded. When you import a recorded .bwf file, it is added to the timeline at the same location it was originally recorded.
The originator (VEGAS Pro) and originator reference (a unique ID number) are also recorded.
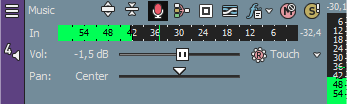
IMPORTANT When input monitoring is on during audio recording, audio effects chains that contain non-in-place plug-ins are displayed in yellow ( ) to indicate that automatic plug-in delay compensation is being used. Chains that cannot be used for live monitoring are automatically bypassed and are displayed in red (
 ).
).
Recording audio
-
Connect an audio source to your sound card's input.
-
Position the cursor where you want to start recording.
-
Select the Arm for Record buttons
 on the tracks where you want to record. Arming a track enables it for recording.
When a track is armed, the track meter displays the track's level. If input monitoring is not on, the meter displays the level of your input source. If input monitoring is turned on, the meter shows the level of the input source plus the track effects chain.
-
Click the Record button
on the Transport bar to start recording. -
To stop recording, click the Record button again or click the Stop button
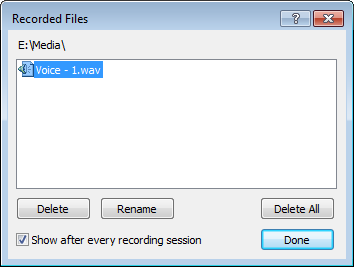
 on the Transport bar. The Recorded Files dialog is displayed.
 -
Use the Recorded Files dialog to confirm the file name and location of your recorded audio. Click Delete or Delete All if you do not want to save the recorded files, or click Rename to change the file's name.
-
Click Done to close the Recorded Files dialog. Your recorded file is displayed as a new event in the timeline, and the recorded file is added to the Project Media window.
Recording multiple takes
If Loop Playback  is turned on for your project, playback will loop during recording and a take will be created each time playback returns to the start of the loop region. The last take recorded is set as the active take.
A region is created to indicate the beginning and ending of each take in the recorded file. These regions are not part of your project, but are visible in the Trimmer window.
For more information, see Using the Trimmer and Using takes as alternate versions of events
Recording a new take for an audio event
You can record into an audio event by selecting it. The record time is determined by the event's length.
-
Select the event and position the cursor at the beginning of the event.
-
Select the Arm for Record button
on the track that contains the event.
-
Click the Record button
on the Transport bar to start recording. -
To stop recording, click the Record button again or click the Stop button
on the Transport bar. The Recorded Files dialog is displayed.
Select the Loop Playback button on the Transport bar to record multiple takes within the selected event.
The last take recorded is set as the active take for the event.
For more information, see Using takes as alternate versions of events
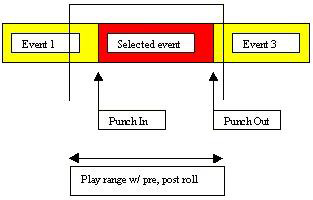
Recording into a time selection or event (punch-in)
You can record a new take into a selected audio event using a time selection. This option provides room for pre-roll and post-roll during recording.
-
Select the event you want to punch into:
-
If you want to punch into the middle of an event, select the portion of the event you want to replace and press S to split the event.
For more information, see Splitting events -
Select multiple events to create multiple punch-in and -out points.
-
Create a time selection to set the amount of pre-roll and post-roll and position the cursor at the beginning of the time selection. The edges of the selected events serve as the punch-in and punch-out points:
-
Select the Loop Playback button
if you want to record multiple takes of each event. A new take will be created each time the cursor passes through the selection. -
Select the Arm for Record button
on the track that contains the event.
-
Click the Record button
on the Transport bar to start recording.If input monitoring is turned on, the track's original audio is played until the cursor reaches the selected event. When the cursor plays through the selected event, you'll hear your recording input, and the track's original audio is played again when the cursor moves past the selected event.
-
To stop recording, click the Record button again or click the Stop button
on the Transport bar. The Recorded Files dialog is displayed. -
Use the Recorded Files dialog to confirm the file name and location of your recorded audio. Click Delete or Delete All if you do not want to save the recorded files, or click Rename to change the file's name.
-
Click Done to close the Recorded Files dialog.
The last take recorded is set as the active take for the event.
For more information, see Using takes as alternate versions of eventsTIP When performing punch-in recording, recording occurs underneath the pre- and post-roll. If your subject starts early, for example, you can adjust the event to uncover the recording. Hold Ctrl+Alt while dragging the crossfaded area to slip the crossfade in either direction.
For more information, see Adjusting an event's length and Slipping and sliding events
Changing the recording device and attributes for recording audio
The Record Input button  in a track header chooses the audio input that will be used to record to a track and allows you to configure input monitoring.
To choose your recording input, click the Record Input button , choose an audio device from the menu, choose Mono or Stereo from the submenu, and then choose an input.
To record from an input bus, click the Record Input button , choose Input Busses from the menu, and then choose an input bus from the submenu.
For more information, see Using input busses
Monitoring audio levels
While you're recording, a responsive meter is displayed in the track header to monitor the incoming signal level of the selected recording device. It is important that you record with the highest signal possible without clipping.
When a track is armed, the track meter displays the track's input level. If input monitoring is not on, the meter displays the level of your input source. If input monitoring is turned on, the meter shows the level of the input source plus the track effects chain.
A reading of 0 dB is the maximum for a digital signal. Clipping occurs when the incoming signal is too high to be represented as a digital value. The result is distortion in the recording. A clipped signal will be indicated by a red Clip warning at the top of the meters.
Right-click the meters and choose a command from the shortcut menu to adjust the display of the meters.
Toggling record input monitoring
If you're using a low-latency audio device, VEGAS Pro can perform record input monitoring so you can hear your recording signal with real-time track effects.
To turn on input monitoring, click the Record Input button and choose Input Monitoring On or Input Monitoring Auto from the submenu. During recording, your signal will be played back with the current track effects chain, but a dry (unprocessed) signal is recorded.
When Input Monitoring Auto is selected, you will hear the input monitor signal when playback is stopped and during recording. If you're recording into selected events, you'll hear the input monitor signal only when the cursor passes over the selected events.
When Input Monitoring On is selected, the behavior is similar to Input Monitoring Auto mode, but you will always hear the input monitor during recording—monitoring is not toggled on and off when recording in to a selected event.
For more information, see Adding audio effects
NOTE Your ability to monitor effects in real time is dependent on your computer's performance. Effect automation envelopes are bypassed during record monitoring.
Recording using the metronome
From the Options menu, choose Metronome before recording. When you start recording, the metronome will start playing at the tempo specified on the Ruler tab of the Project Properties dialog.
To change the sounds used by the metronome, use the Audio tab in the Preferences dialog. For more information, see Preferences - Audio Tab
NOTE The metronome's sound is not mixed in the final rendering of the project.