Adjusting an event's length
You can use any of the following methods to adjust events.
Trimming the start or end of an event with your mouse
With the Normal tool  selected, drag either end of an event.
To make it easier to grab the edges of the event, handles are displayed as soon as you move the mouse over them.
You can deactivate the display of these handles by selecting the corresponding entry in the More button of the event.
The event edge will snap to grid lines or markers if Enable Snapping is selected or will snap to frame boundaries if Quantize to Frames is selected; you can hold the Shift key while dragging to temporarily override the current snapping setting.  For more information, see Enable snapping and Quantize to frames
TIP Hold Shift while dragging the event edge to ignore event grouping for fast J and L cuts.
NOTE If you drag the end of the event past the end of the media file, the event will repeat if the Loop event switch is turned on; if the switch is turned off, silence is drawn. For more information, see Applying switches to events
Trimming an event to the cursor position
-
Select the Normal tool
. -
Select the event you want to trim.
-
Position the cursor at the point where you want the event to start or end.
-
Trim the start or end of the event:
-
Click the Trim Start button
 (or press Alt+[) to trim the start of the event to the cursor position.
 -
Click the Trim End button
 (or press Alt+]) to trim the end of the event to the cursor position.
-
Using keyboard shortcuts to edge trim events
With this method, you can quickly jump through your project and adjust cuts until they're perfectly synchronized. If you have an external multimedia controller, it's even easier. For more information, see Using a multimedia controller
-
If you want downstream events to ripple as you trim, click the Auto Ripple button
 to turn on Auto Ripple mode. For more information, see Post-edit ripple
 -
Select the event you want to trim.
-
Press [ or ] (or 7 or 9 on the numeric keypad) to move the cursor to the event edge you want to trim. [ or 7 selects the beginning of an event or moves to the previous event edge. ] or 9 selects the end of the event or moves to the next event edge. A red bracket is displayed to indicate which event edge will be trimmed.
-
Use the 1, 3 and 4, 6 keys on the numeric keypad to trim the current event edge:
-
Press 1 to trim one video frame left, or press 3 to trim one video frame right (or hold Ctrl+Shift+Alt while rolling the mouse wheel).
-
Press 4 to trim one screen pixel left, or press 6 to trim one pixel right (or hold Ctrl+Shift while rolling the mouse wheel). Depending on the current zoom level, the trim duration will vary.
-
Hold Ctrl while pressing 1 to time compress one frame left, or press 3 to time stretch one frame right.
-
Hold Ctrl while pressing 4 to time compress one pixel left, or press 6 to time stretch one pixel right.
-
Hold Alt while pressing 1 to slip trim (the media moves with the event edge) one frame left, or press 3 to slip trim one frame right.
-
Hold Alt while pressing 4 to slip trim one pixel left, or press 6 to slip trim one pixel right.
-
Hold Ctrl+Alt while pressing 1 to slide a crossfade or transition one frame left, or press 3 to slide one frame right (adjacent trim).
-
Hold Ctrl+Alt while pressing 4 to slide a crossfade or transition one pixel left, or press 6 to slide one pixel right (adjacent trim).
-
Repeat steps 3 and 4 as necessary.
Pressing 5 on the numeric keypad exits edge-trimming mode. If you are not in edge-trimming mode, press 1, 3, 4, and 6 on the numeric keypad to nudge events on the timeline by frame (1 and 3) or by pixel (4 and 6).
Hold Shift while dragging the event edge to ignore event grouping for fast J and L cuts.
Trimming adjacent events
Use the Slide tool  or h old Ctrl+Alt while dragging the event edge between two events. The mouse pointer is displayed as a an
  . The edges of the selected event and the adjacent event are trimmed simultaneously in the direction you drag.
TIP Hold Ctrl+Alt+Shift while dragging the event edge between two events to ignore event grouping for fast J and L cuts. If you are using the Slide tool, hold Shift to ignore event grouping.
Trimming all but the selected portion of an event
-
Drag to make a timeline selection (or hold down the Shift key and use the arrow keys to make the selection).
-
Click the Trim button
 (or press Ctrl+T) to delete all data outside of the selection. For more information, see Trimming events
Time-stretching an event
NOTE The Resample and stretch quality setting on the Audio tab of the Project Properties dialog determines the quality of processing when time-stretching audio events. For more information, see Setting project properties
To change the duration of an event without changing its contents, use the Time Stretch/Compress tool  or hold Ctrl while dragging the right or left edge of an event. The mouse pointer is displayed as a
  . You can use the Time stretch/pitch shift controls in the Event Properties dialog to specify whether the pitch of an audio event will be preserved while stretching. For more information, see Editing event properties
As you drag the edge of a video event, a zigzag line is displayed between video frames to show you that the event has been stretched:
For more information about the Time Stretch/Compress tool, see Editing Tool
If Active Take Information is selected from the View menu, audio events will display a percentage in the lower-right corner of the event to indicate the playback rate after stretching. If the media has a known tempo, the effective playback tempo (after stretching) is listed in parentheses after the stretch amount.
TIP You can also use the Slow Motion plug-in for a high quality slow motion effect!
Slip-trimming an event
Use the Slip tool  or hold Alt while dragging the right or left edge of an event. The slip-trim cursor
  is displayed.
As you drag the event edge, the opposite edge of the event will remain fixed, trimming the media from the edge you drag.
-
Use the Slip tool or hold Shift or hold Alt+Shift while dragging any portion of an event to slip-trim the right edge. The left edge of the event will remain fixed on the timeline, and the media is slipped past the left edge of the event. This slip mode is useful when you want to slip an event without changing its last frame.
-
Use the Split Trim tool
 or hold Ctrl+Alt+Shift and drag an event to split it at the point you click and trim the event in the direction you drag (eraser mode). For more information, see Slipping and sliding events
Holding the Shift key temporarily overrides snapping if it is enabled. Release the Shift key while dragging to snap the event to available snap points.
For more information about the Split Trim tool, see Editing Tool
-
If you want to slip all of an event's takes when slipping media, choose Slip All Takes from the Options menu.
For more information, see Using takes as alternate versions of events
For more information about the Slip tool, see Editing Tool
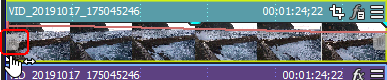
The following image demonstrates holding Alt while dragging the right edge of an event to the right:

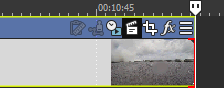
The following image demonstrates holding Alt while dragging the right edge of an event to the left:
