DV camera / HDV camera
The description in this section refers to the recording function before the updates in version
Click the corresponding button in lower area of the record dialog to access this function.

More information about Recording dialog
Connect a DV or HDV camera
-
Connect the digital output of the switched-off camera with the computer's DV interface (also called FireWire or iLink).
-
Insert a DV cassette or the storage device into the camera.
-
Switch your camera's operating mode to "Video recorder" or "Playback".
The camera is now ready to transfer video to the computer.
NOTE You may also use a HDV camera in DV mode to, for example, transfer recordings in the old DV format. Problems have been noted with this mode in many cameras, therefore it is recommended that the Record mode of the camera is also switched to DV, switching the camera off and then on again.
Capturing from DV video recorders or cameras
NOTE If you want record using the more space-saving MPEG format, record the "Record DV as MPEG" option in the recording dialog. Uncompressed DV capture requires approx. 220 MB per minute of video.
-
Check to see if a DV camera driver has been selected.
-
Name the recording and specify a storage location.
-
You can access the appropriate place on the camcorder tape by using the remote control buttons: Shuttle forwards, backwards, and start/stop playback.
-
Click on the "Record" button to start recording
 . Take note of your remaining hard drive space.
 -
Stop recording with the "Stop" button and exit the record dialog.
You can see the recording in the project window in the lower third of the screen.
NOTE In the DV recording dialog, you can set clips from the DV video which will then be recorded one after the other (batch capturing). Find out more under "Batch recording".
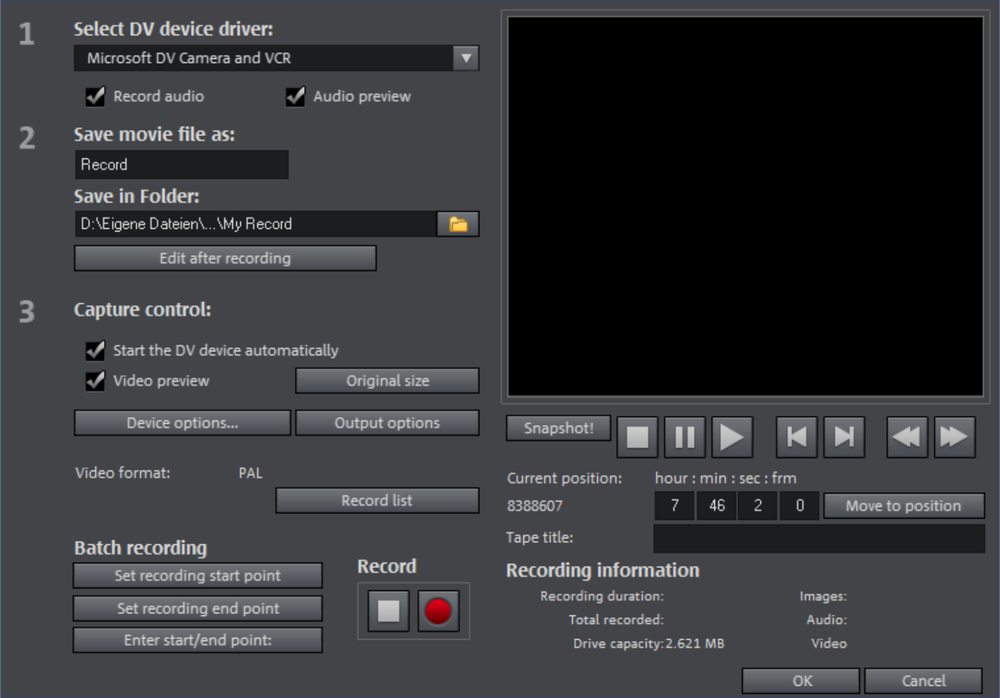
Dialog elements
|
Select DV device driver: |
This is where the driver for your DV device is displayed. When "Audio Recording" is deactivated, only video without sound is recorded. "Audio preview" activates the audio output of the recording. NOTE The audio preview is always deactivated at first, since DV cameras usually include built-in speakers. |
||||
| Save video file as/Save in the following file |
You can enter the name of the movie to be recorded here. You may also select the folder where you wish to store your video file. The default recording folder is set as standard, but you can change this in the path settings under "File > Program settings > Folder". |
||||
| Edit after recording | Here you can access the automatic editing options. | ||||
| Start the device automatically | Starts the DV recorder or DV camera automatically when the "Record" button is pressed. This does not function with all digital cards/video devices. | ||||
| Video preview | You can see a preview of your movie on the program monitor. | ||||
| Original size | This option allows you to preview the video in the original size, and where applicable fullscreen mode. To return to the dialog use the "Esc" key. | ||||
|
Record list: |
|
||||
| Batch recording |
Here the start and end points can be set for the capture. This allows you to search the entire video for all captures to be used and list them for planned capture. This is processed in sequence when the recording starts (via the red button). That way you do not need to record each scene individually. You simply determine recording time points, and the computer takes care of the rest. To set the start and end points precisely, click "Enter start/end point". |
||||
| Record |
Starts the capturing process. Also contains the list of scheduled recordings. These are processed step-by-step (batch capturing). |
||||
| Stop |
The recording process is stopped. |
||||
| Snapshot |
This will create a frozen image directly from the program monitor. Start the camcorder and watch the preview window. When the image you want appears click "Snapshot". Or you can navigate using the remote control to the position you want, and stop there in Pause mode. Stopped playback on the DV camera will not deliver an image. The images are saved in the record directory as graphics files in the set resolution. |
||||

Remote control
Digital camcorders can be controlled remotely by Movie Studio. This does not function with all digital cards/video devices. If your hardware does not support the remote control function, the buttons will not be usable.
The necessary transport buttons can be found in the DV or HDV recording dialog.
| Tape ID: |
Enter a name for your tape here. Movie Studio requires this name for the DV logging feature. |
| Recording information |
Displays various data regarding your captured video. |
| Enter start/end point: |
Enter the exact start and end point or the recording length for a scene. Both values can be entered as ATN (absolute track number) or as a timecode in hours:minutes:seconds:frames. |