Recording AVCHD
The description in this section refers to the recording function before the updates in version
Click the corresponding button in lower area of the record dialog to access this function.

More information about Recording dialog
When importing from AVCHD/SD card/USB, files created by the camera will be copied to the computer. In addition to standard removable storage devices, "MTP" devices are also supported. MTP is short for "Media Transfer Protocol" and refers to the transfer protocol of media devices such as photo cameras, video cameras and MP3 players.
If a less powerful computer is used, it may be helpful to transform AVCHD files upon import to a MPEG-2 format. A corresponding query appears during importing of these files.
NOTE When importing AVCHD videos it is necessary to activate the MPEG-4 codec and download an audio package upgrade if necessary. Movie Studio offers this option as soon as a codec is required.
NOTE Refer to the camera's instruction manual for the proper procedure.
After selecting the import, the following dialogue will open:
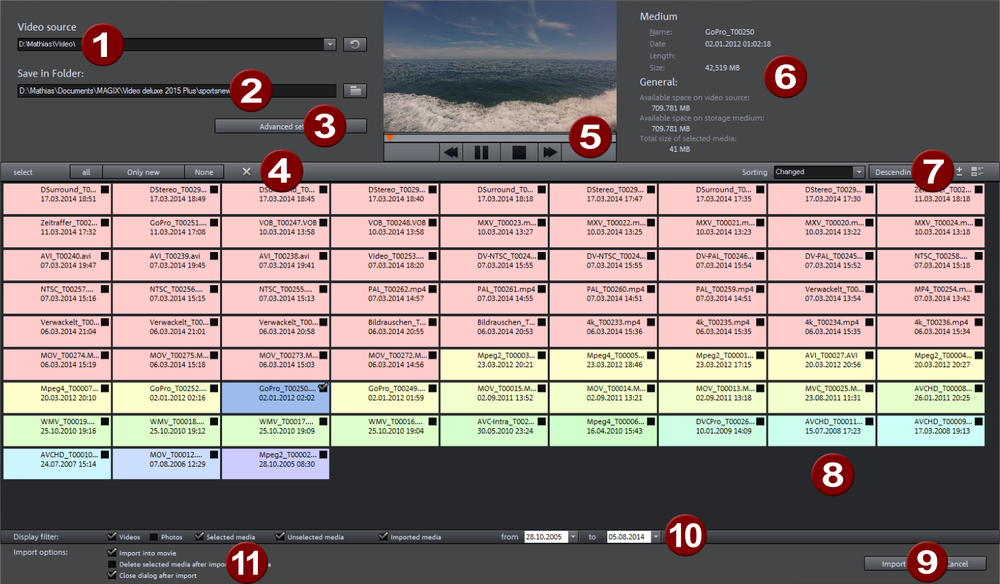
|
1 |
Video source: Here you specify the hard drive that will be used to access the storage medium or connected camera. |
|
2 |
Save in following folder: Create a target folder for the files to be imported. |
|
3 |
Advanced settings: Adjust various settings for the name and date of the files to be created. |
|
4 |
Select: This offers self-explanatory options for file display ("all", "only new", or "none"). |
|
5 |
Preview monitor and transport control: Here you can play back, rewind or fast forward clips in the file list. |
|
6 |
Medium/General: An info area for the files is provided to the right next to the preview monitor. |
|
7 |
Options for displaying files, here you can also specify the criteria which will be used to sort the files. |
|
8 |
File list: The contents of the selected drive are shown here. Use the display filters (10) to scale down the display of the file types shown. You can select every file separately using the little check boxes in order to import them later. NOTE The files are color-coded. The same colors indicate roughly the same recording times, so that you can quickly recognize which recordings were made at the same time. Color assignments come with a certain "intelligence", which means they take into account how far apart the displayed recordings are chronologically. |
|
9 |
Import: Imports the selected file to the target folder. |
|
10 |
Display filter: The display filter can be used to define whether certain files should be hidden. When you uncheck a box, the corresponding files will be hidden.
|
|
11 |
Import options: Here you can define what happens after importing.
|