360° videos
In a 360° video, the action is recorded in all directions simultaneously. 360° video can be shot with special cameras that contain two 180° lenses, or by creating an array of several normal cameras to record in different directions. In the simplest array, there are two cameras with super wide angle lenses that record in two directions; better setups use six or more cameras.
The result is that the viewer can view "around" themselves by determining the view direction. To do this on a PC, drag the mouse during playback. On mobile devices, the built-in orientation sensor can be used: The view direction follows the device's rotation. In combination with VR glasses or a smartphone attachment such as Samsung Gear VR or Google Cardboard, it is possible to be completely submerged in a virtual environment with a 360° video.
360° videos are supported by the most important video platforms like YouTube, Vimeo, and Facebook.
Technically, 360° videos are regular, two-dimensional videos. The images of the sphere surface around the camera are displayed distorted, similarly to how the earth's surface is projected onto flat maps of the world. This results in relatively large videos in order to provide enough resolution along the strongly distorted edges after rectification.
Preprocessing/Stitching
Stitching describes the process of combining images from individual cameras to create one, large image and projecting the spherical image onto the rectangular surface of the video. While more advanced cameras can perform their own stitching, most simple cameras with only two lenses create a video which needs to be stitched together to create a true 360° video.
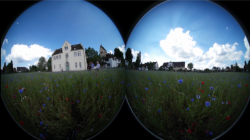
FIGURE Unstitched video image from two 180° fisheye lenses on a 360° camera
These cameras often also include stitching software, but the more elegant solution is to perform stitching directly in Video Pro X. The stitching feature is located under the Effects tab in the 360° video section of the Media Pool.
Select the video object and effect, then click "Apply effect". The video should look like this in the video monitor:
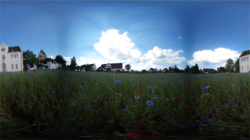
For standard 360° cameras with two lenses, there are presets located in the list field above. For other camera models, you can change the parameters below.
NOTE Video Pro X normally recognizes 360° video material in need of stitching and automatically applies the effect.
360° editing
There are two ways to work with 360° in Video Pro X:
-
Creating a 360° video from your 360° output material and adding content (videos, images and titles) and effects to it, or
-
adding your 360° content to a normal video and specifying the display section and direction of view.
The editing features for both scenarios are available under 360° video under the "Effects" tab in the Media Pool. The editing mode which makes the most sense for the application scenario in question is automatically displayed under 360° editing.
Creating a 360° video
Video Pro X automatically switches to 360° mode when you load 360° material (a prompt will appear). The program will also automatically perform any necessary stitching (see below).
For these types of videos, the video monitor is switched to a special 360° mode which straightens the image and allows you to move the direction of view using your mouse. (You can get to 360° mode by going to the menu located in the upper left-hand corner of the program monitor.)

If Video Pro X does not automatically recognize your 360° video material as such, you can manually switch to 360° mode by going to the movie settings and selecting a corresponding video preset (360°...) at the bottom of the list.
You can cut this video and apply effects as you would a normal video in Video Pro X. But bear in mind that most effects in the View/Animation section will remove the 360° effect.
NOTE Automatic recognition currently only works for Ricoh (Theta m15, S and SC) and Samsung Gear 360 models and for 360° projects you have exported yourself.
Adding content to 360° Videos
Position object in 360° space editing mode
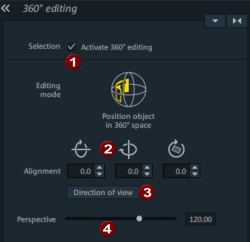
To add content to a 360° video (e.g. floating titles), proceed as follows:
-
Place the play cursor where you want the title object to appear.
-
First create the title object.
-
Select the object and switch to the 360° editing effect in the Media Pool.
-
Activate 360° editing (1)
-
In the video monitor in 360° mode, use the mouse to set the view to the position where you want the title to appear.
-
Click "Orient to perspective" (3) to place the title precisely in the direction of view. Use perspective (4) to specify the distance between the title object and the viewer.
-
To make the title fly in and out, you can apply a keyframe animation to the perspective and orientation parameter (2).
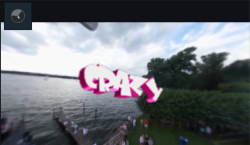
FIGURE Video monitor in 360° mode, with a 3D title object added to a 360° video
Adding 360° content to other videos
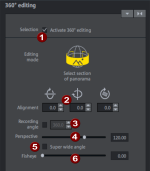
"Select section from panorama" editing mode
To add 360° videos or photos to a normal video, proceed as follows:
-
Load the 360° video or photo. If a message appears asking if you want to switch to 360° mode, select "No" — we do not want to create a 360° video, we simply want to add 360° footage to a normal video.
-
Select the object and activate 360° editing (1).
-
Use "Orientation" (2) to define the direction of view. It's also possible to simulate a camera pan through three-dimensional space by animating these parameters and the viewing angle (4) using keyframes.
-
The "Camera angle" (3) is preset to 360° for 360° videos; for panorama photos with a lower camera angle, you can check the box and set the camera angle to a different value. You can try to get close to the "exact" value by eyeballing the effect and adjusting the angle correspondingly.
-
"Perspective" (4) specifies how much you want to zoom in or out.
-
The remaining parameters can be used to correct distortion: "Super wide angle" (5) widens the perspective beyond the maximum permitted angle of 180° all the way up to 360°. This lets you turn panoramas into eye-catching mini-planets. The fisheye lens ("fisheye"6) distorts the perspective. If an image already contains distortion as a result of a wide-angle shot, the fisheye effect can be used to correct this. For instance, a curved horizon can be "straightened".
360° scene rotation
When editing 360° videos, you have the option of controlling the viewing angle. You can change perspective, highlight certain areas, or focus on specific details.
This effect rotates the entire 360° scene along all three spatial axes. This allows you to make corrections if the 360° camera was upside down or crooked during filming.