Using the Video Preview window
From the View menu, choose Video Preview to toggle the display of the Video Preview window.
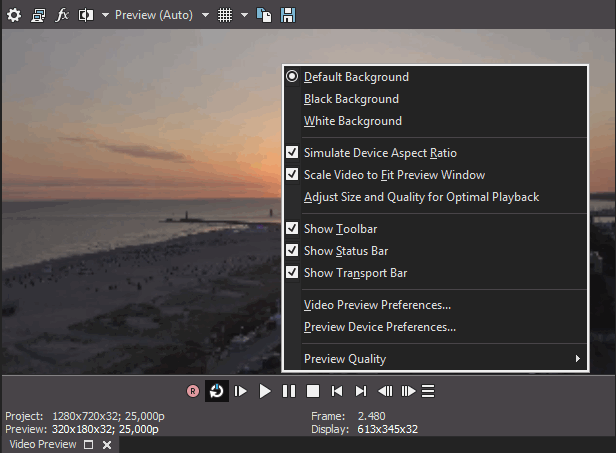
The Video Preview window displays a project's video output at the current cursor position during editing and playback. The playback includes any effects that you have applied to it. This window is also useful when editing frame by frame for synchronizing audio. Right-click anywhere in the window to display a shortcut menu with Video Preview window options.

-
If you want to emphasize frame rate during preview, right-click the Video Preview window and select Adjust Size and Quality for Optimal Playback. When the command is not selected, video quality is emphasized, and the frame rate will be reduced if necessary.
-
Select the Use project output rotation setting checkbox on the Preview Device tab of the Preferences dialog if you're rendering a rotated project and want to use the Output rotation setting from the Project Properties dialog for previewing your project.
When the checkbox is cleared, the media is rotated according to its Media Properties setting, but the Video Preview output is unrotated—you can use this setting to proof your project on an unrotated display.
For more information, see Creating rotated projects and Preferences - Preview Device Tab
-
By default the Video Preview Transport tool bar shows the Play, Pause, Stop, and More buttons.

To access additional buttons click the More button
and click the button you wish to access.
To add a button to the Transport Toolbar:
-
Click the More button.
-
Click Edit Visible Button Set.
-
Check the box next to the button to you would like to add, and click OK.
The button will now be visible each time you open the application.
To remove a button from the Toolbar:
-
Click the More button.
-
Click Edit Visible Button Set.
-
Uncheck the box next to the button to you would like to remove, and click OK.
-
Editing video properties for your project
Click the Project Video Properties button 

Previewing on an external monitor
Click the Video Preview on External Monitor button  to send your video output to the device specified on the Preview Device tab of the Preferences dialog.
If you have not specified a device, the Preview Device tab will be displayed when you click the Video Preview on External Monitor button.
TIP Video is sent to the external monitor and the Video Preview window at the same time. If you experience dropped frames, try clearing the Display frames in Video Preview window during playback checkbox on the Preview Device tab of the Preferences dialog.

Adding or bypassing video effects
Click the Video Output FX button  to apply an effect to every video event in your project.
You can use the Split-Screen View button  in the Video Preview window to create a split-screen preview that bypasses all video effects (track effects, event effects, media effects, and video output effects) without removing them from your project.

You can right-click the button and choose a command from the shortcut menu to enable, bypass, or delete effects.
For more information about using video effects, see Adding video effects
Adjusting the preview quality and resolution
Click the Preview Quality button and choose a setting from the menu to change the quality and resolution for rendering your video preview.
This setting is used for previewing only and has no effect on the final rendered video. Decreasing the preview resolution can allow the VEGAS Pro Video Preview window to display a higher frame rate, especially for complex projects that contain overlays, transitions, and effects.
The Auto setting will adjust the frame size to fit the Video Preview window size. The Full setting processes frames at the project frame size. The Half setting processes frames at half the project frame size. The Quarter setting processes frames at one-quarter of the project's frame size. For example, if you have an NTSC (720x480) project, Half creates a 360x240 preview; Quarter creates a 180x120 preview.
TIP Choosing a Quarter or Half setting can improve playback performance, especially when previewing high-definition source material.

If you want to display square pixels in the Video Preview window even if the Pixel aspect ratio setting in the Project Properties dialog is using nonsquare pixels (DV), right-click the display and choose Simulate Device Aspect Ratio from the shortcut menu.
If you want the preview to fill the Video Preview window, right-click the display and choose Scale to Fit Preview Window from the shortcut menu.
-
If you want to emphasize frame rate during preview, right-click the Video Preview window and select Adjust Size and Quality for Optimal Playback. When the command is not selected, video quality is emphasized, and the frame rate will be reduced if necessary.
-
Try setting the preview quality to Preview | Full and enabling Scale to Fit Preview Window.

|
Item |
Description |
|---|---|
|
Preview |
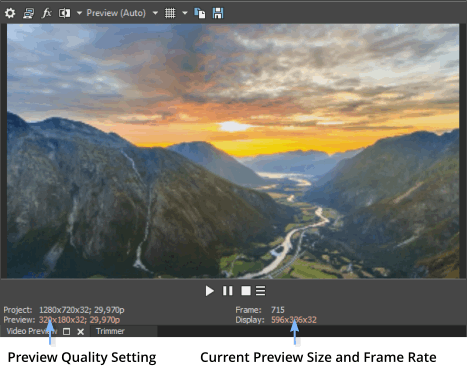
The Preview indicator in the Video Preview window represents the setting of the Video Preview Quality button. |
|
Display |
The Display indicator represents the current playback properties. If you're using an Auto setting for preview quality, this indicator will represent the scaled frame size. If your video preview is dropping frames, you'll see the actual frame rate in this section. |
Using Video Preview overlays (safe areas, grid, closed captions, and color channel isolation)
Click the down arrow next to the Overlays button  and choose a setting from the menu to configure the display of the Video Preview menu.
Click the Overlays button to toggle between a standard preview and the selected preview mode.
TIP Overlay settings from the Video Preview window are also applied to the video monitor in the Trimmer window.
|
Preview Mode |
Description |
|---|---|
|
Grid |
Choose Grid to display vertical and horizontal lines over your video. You can use the grid to help you align objects. Set the grid spacing using the Horizontal grid divisions and Vertical grid divisions settings on the Video tab in the Preferences dialog. |
|
Safe Areas |
The Video Preview window displays the entire video frame, although most television monitors will not display all of this data. Choose Safe Areas to display borders around your video to represent the visible areas for action and titles. The outer border marks the area that will be visible on a television screen, and the inner border is the suggested area for titles. After verifying that your action and titles are within the safe areas, however, you should test your project on the destination television monitor. Set the grid spacing using the Action safe area and Title safe area settings on the Video tab in the Preferences dialog. |
|
If you're working with a video that contains closed captions, you can preview your captions by using overlays in the Video Preview window. Select CC1, CC2, CC3, or CC4 to turn on the caption type that you want to preview.
|
|
|
Color Channel Isolation |
Choose a color channel to select the specific channel to be isolated and whether the channel should be displayed in grayscale only. TIP Use the Alpha as Grayscale setting to isolate the Alpha channel mask and display it in grayscale. |
|
360° mode |
Switches the Preview window into a special 360° mode to interactively set the perspective when working with 360° video. |
Toggling multicamera editing mode
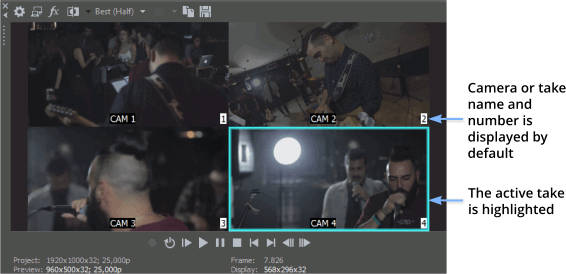
From the Tools menu, choose Multicamera, and then choose Enable Multicamera Editing to enable multicamera editing mode.
In multicamera editing mode, the Video Preview window switches into multicamera mode, with a multicamera tiled view showing the contents of all takes simultaneously. The active take is highlighted with a colored border.


TIP When multicamera editing mode is active, video envelopes, effects, and motion are bypassed in the Video Preview window to preserve your playback frame rate.
Copying the current frame to the clipboard
Click the Copy Snapshot to Clipboard button 
You can change the size of the image using the Preview Quality button: choose Auto or Full to capture the frame at its full resolution, or choose Half or Quarter to capture a smaller image.
Saving the current frame as a file
Click the Save Snapshot to File button 
You can change the size of the image using the Preview Quality button: choose Auto or Full to capture the frame at its full resolution, or choose Half or Quarter to capture a smaller image.
The Save Snapshot to File dialog is displayed to allow you to choose the format and location where you want to save the file. The file is automatically added to the Project Media window.
View or hide the status bar
Right-click the Video Preview window and choose Show Status Bar to toggle the display of the status bar at the bottom of the window.
|
Command |
Description |
|---|---|
|
Project |
Displays the frame size, color bit depth, and frame rate from the Video tab in the Project Properties dialog.
|
|
Preview |
Displays the frame size, color bit depth, and frame rate that will be used for previewing. Right-click the Video Preview window and select Display at Project Size if you want to preview only using the project settings. |
|
Frame |
Displays the number of the current frame. |
|
Display |
Displays the current frame size, color bit depth, and frame rate of your preview. If you are unable to preview at the full frame rate, decrease the Video Preview Quality setting or use dynamic RAM previews.
|
Viewing or hiding the transport bar
Right-click the Video Preview window and choose Show Transport Bar to toggle the display of the transport bar at the bottom of the window.
|
Button |
Description |
|
|---|---|---|
|
|
Record |
This button starts recording on all armed tracks. If no tracks are armed, a new track will be created automatically.
|
|
|
Loop Playback |
Plays only the events in the loop region in a continuous mode. |
|
|
Play from Start |
Starts playback from the beginning of the project regardless of the current cursor position. When you stop playback, the cursor returns to its original position. |
|
|
Play |
Starts playback from the cursor position. TIP Select the Make spacebar and F12 Play/Pause instead of Play/Stop checkbox in the General Preferences tab if you want the F12 and spacebar keyboard shortcuts to toggle between Play and Pause mode. In this mode, the cursor will maintain its position. |
|
|
Pause |
Pauses playback and leaves the cursor at its current position. |
|
|
Stop |
Stops playback or recording and returns the cursor to its starting position. |
|
|
Go to Start |
Moves the cursor to the beginning of the project. |
|
|
Go to End |
Moves the cursor to the end of the project. |
|
|
Previous Frame |
Moves the cursor one frame to the left. TIP Click and hold the Previous Frame and Next Frame buttons to move the cursor multiple frames. |
|
|
Next Frame |
Moves the cursor one frame to the right. |


