Position and animation effects

 Size/Position/Rotation
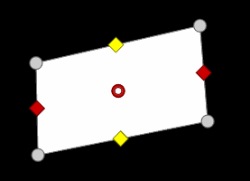
With this effect, you can edit the size, position and rotation of an object (e.g. video, image, title, etc.) in space.
You can also adjust the resize and reposition the object using the handles in the program monitor visually:
-
 the red handles control the width
 -
 the yellow handles control the height
 -
 the gray handles in the corners can be used to adjust both simultaneously
If you want to work using the anchor point, first move the anchor point before changing the position or rotation.
Size
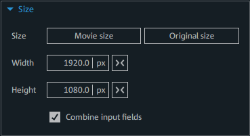
Here you adjust the size of the selected object.
| Movie size | The object will be scaled to the size of the movie. |
| Original size | The object will be displayed in the original size. |
| Width and Height |
Using the input button, enter an absolute size (px) or relative value (%) for the width and height. The relative value refers to the footage size, the absolute size refers to the size of the object. Click the units to switch between pixels and percentage. |

|
The object will be reset to the original size. |
| Combine input fields | Enable this option to retain the aspect ratio of width and height. |
Scaling in any direction is always performed with relation to the anchor point. If you compress or stretch the element, the area on top of the anchor point will not move.
Location

| Horizontal/Vertical |
These values can be used to move the object in relation to its anchor point. Enter an absolute size (px) or relative value (%) to specify the position of the anchor point. The object moves in relation to the predefined anchor point. Click the units to switch between pixels and percentage. |
||||||||

|
The object's position is moved so that the anchor point is reset to 0 and centered horizontally or vertically in the center of the movie. | ||||||||
|
|
This button can be used to easily adjust the object per click.
|
To visually adjust the position, click on the object and drag it with the mouse to the desired position.
When the object is moved, the anchor point is also moved.
Rotation
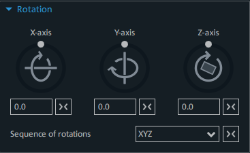
The layer in which the element is situated may be rotated on three spatial axes (X, Y, Z). The anchor point also serves as the center of rotation. The angle of rotation can be adjusted directly by the three control elements or entered in the fields using degrees (°). The set rotations are applied one after the other. The order used can be set in the selection field. This might be necessary in certain situations, e.g. if you specify more than one rotation or want to rotate around more than one axis.
Anchor point 

Using the anchor point, you can select and move the rotation point (center point) of an object freely. The anchor point functions as the reference point for all three operations.
| Horizontal/Vertical |
Enter an absolute size (px) or relative value (%) to move the object in relation to the anchor point. The position of the anchor point will remain unchanged. Click the units to switch between pixels and percentage. |
||||||||

|
The anchor point is reset to 0 horizontally or vertically. The position of the anchor point remains unchanged. The object will move so that it is centered horizontally or vertically at the anchor point. | ||||||||
|
|
This button allows you to easily align the anchor point on the object with one click. In contrast to entering values, the anchor point moves and the position values will change. The position of the object remains unchanged.
|
TIP The values in the number fields can also be changed by dragging them vertically with the mouse.

 Section
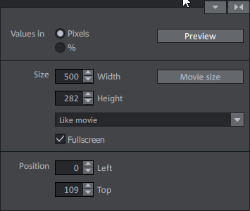
Sections may be used to display only a part of the photo or video.
Specifying sections
-
Select the object in the project window.
-
Set the aspect ratio (see the Drop-down menu).
-
In the program monitor, drag out a frame and adjust it using the eight handles. The frame can be changed depending on the defined aspect ratio.
-
Move the frame to the location you want.
-
You can adjust the size and position of the section using the input buttons if necessary.

 Camera/Zoom Shot
With this effect, you can move a previously selected frame inside the image, creating an impression of camera movement or zoom.
Direction of movement
Determine the direction in which the selected section or image will move during the time selected under "time period". In addition to horizontal and vertical movements, diagonal movements are also possible.

Preview: Displays a preview of the section at the playback marker location.
 From section: The selected picture section is displayed and is then zoomed out to display the entire picture according to the time set in "Duration". If no section has been previously cropped, a central section of 50% of the picture is enlarged for cropping.
 To section: The entire picture is displayed and then zoomed in to show only a smaller picture section according to the time set in "Duration". If no section has been previously cropped, a central section of 50% of the picture is enlarged for cropping.
Direction and time
The option selected here sets the position where the keyframes of each movement effect are set by default. You determine the positions for the start and end of movement.
NOTE The automatically set keyframes can be edited, then the option will be set to "User defined". Read the section "Change the keyframes of an effect after the fact" in the chapter "Animate objects".
 Reset: This button resets all of the current settings.

 Orientation/Horizon
Straighten horizons
The image can be rotated around the axis using the slider. The image is automatically zoomed to avoid black edges.
Show guidelines: Activating this check box displays a grid in the program monitor for orientation during horizontal straightening.
Zoom automatically: This function is preset to active. Unwanted black borders that result from horizon straightening are eliminated by zooming in on the image.
NOTE If the image format does not completely conform to the current movie format and already has black borders, these cannot be eliminated with the horizon straightening function.
Rotate/Flip
 Mirrors the image on the vertical axis.
 Mirrors the image on the horizontal axis.
 Rotates the image 90° clockwise.
 Rotates the image 90° counterclockwise.

 Lens Correction
With the lens correction you can remove image distortions caused by certain lenses. Even "converging lines" can be easily straightened. Here is an example:

Original and picture after lens correction
Setup
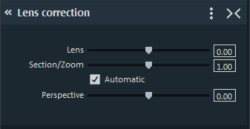
Lens: Affects the curvature of the image
Section/zoom: Corrects the black edges that appear around the image when changes are made to the "lens" parameter.
Automatic: Automatically sets the "Section/zoom" parameter to remove black edges caused by changes to the "lens" parameter.
NOTE Manually changing the "Section/zoom" parameter will automatically deactivate this.
Perspective: Strongly upward or downward facing image material often contains distortions which are unnatural for the human eye and causes so called "converging lines". This parameter balances out these distortions, allowing images with "converging lines" to appear more natural.
TIP The lens correction parameter can be animated. This is particularly useful in videos where the perspective changes, causing, for example, converging lines to also change over time.

 3D Distortion
This enables the perspective of images to be distorted and moved. This produces a 3D impression by causing several components of the image to appear further in front of others.
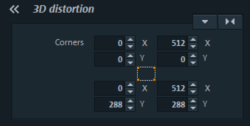
Enter the individual corner points numerically or move them in the program monitor using the mouse here.
NOTE Unlike Stereo3D, this does not involve genuine 3D positioning. The image is only distorted so that it appears three-dimensional on a normal two-dimensional monitor.

 Movement Templates
This is where you can find finished templates for movement effects that can be applied to objects.