Markers
You can set various types of markers within your project in Video Pro X.
 The Lock button (at the very front, next to the time ruler) lets you lock all markers (jump markers, chapter markers) against accidental moving or deleting.
Playback markers
The playback marker indicates the point from which the material – either the project or a selected file from the Media Pool – will be played back. There is a playback marker below each project monitor and an additional one above the timeline in the project window.

The playback marker is displayed as a red triangle below the monitors. In the project window it is displayed as a red triangle.
In order to move the playback marker, double-click on the desired area below the monitor. Alternatively, you can move the playback marker by dragging it with the mouse. While being moved, the current image will appear on the monitor, letting you see your current position in the material.
The playback marker in the video monitor can also be moved by clicking on the lower section of the time scale in the project window. The playback marker will also be moved on the program monitor, as both markers are coupled to each other.
The exact position of the playback marker can be seen in the time display at the top left, below the corresponding monitor. There, you can change the displayed values (Hour:Minute:Second:Frame) per mouse click to reach a certain point in time. Enter the desired value and the playback marker will jump to the corresponding position.
NOTE In the "Playback" tab under "File > Settings > Program", you can set whether repeatedly pressing the space bar during playback resets the playback marker to the current position or moves it to the original position.
Project markers
The "Edit" menu or the keyboard shortcut "Shift + numerical keys 1-0 (0 for the tenth marker) allows you to set a project marker at the current position of the playback marker. These function as a mental marker or indicate certain positions or events within the project.
After selecting the menu item, a dialog appears to input a name for the marker to be created. The first ten project markers may be accessed via Ctrl + number keys 1-0.. This allows you to jump to a particular position of a longer video immediately, without scrolling and searching.
Project markers may be deleted or renamed via the context menu at any time. This does not provide direct influence on the result, but they do make the workflow much easier.
Snap markers and transients
Objects, object edges, markers or the playback marker will jump automatically to particular "Key positions" when you move them close enough with the mouse. This is called "snapping". Select a location in the object with a snap marker to indicate where another object should snap in. This can be helpful, for instance, if you want a title to be shown at a specific position in a video object. You can find the "Snap Marker" in the Media Pool under "Effects" > "Audio effects".
Set snap markers
-
To set a snap marker, select an object and place the playback marker at the position where you want to place the snap marker.
-
Now click on the button "Set snap marker".
-
You can drag and drop a snap marker with the mouse to move it.
You can set as many snap markers as you like per object.
Align snap marker with transients
Transients are signal peaks in audio material that can also appear in video footage; e.g. a door slamming shut. Transients in video footage can be used as a starting point for editing – for instance, fading in a title or making a picture-in-picture effect appear. The "Align snap marker to transients" feature analyzes the signal peaks of the selected object and sets snap markers to these locations. This moves snap markers that have already been put in place near the transients into the new locations.
NOTE Combined objects must be displayed separately so that transients can be seen clearly. In the context menu of the combination object, select "Audio functions" > "Video/Audio on separate tracks". Snap markers are set independently of this setting.
Delete all chapter markers
A chapter marker defines the beginning of a new chapter. Chapters serve to improve navigation when burning the project to disc. The following options are provided via "Edit > Marker" or by right clicking on the playback marker.
Set chapter markers
 Places a chapter marker at the position of the playback marker. This creates a chapter entry in the disc menu in case the movie is being burned to disc.
You can rename the chapter markers by right clicking and selecting "Rename" in the context menu. The new name will also appear in the chapter menu.
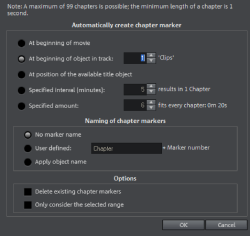
Set chapter markers automatically...
This option automatically sets chapter markers in the project according to specific rules that will then appear as chapters in the film menu of a disc. This is useful if you need to burn a disc immediately after recording.

At the beginning of a movie: The movie contains only one chapter
At object starts in a track: Every object in a track creates a chapter, Track 1 is preset.
At the position of existing title objects: Subtitles, for instance, as faded-in subheadings, give the position of the chapter markers.
Provide interval (in minutes)/provide quantity: If the chapters are separated without any particular method and are just needed for quicker navigation, chapter markers may also be inserted in pre-defined intervals or as a pre-defined number of chapter markers.
Naming chapter markers
No marker name: Marker name and marker number are not specified.
Custom: You can use a custom name. A sequential marker number will be attached to it.
Apply object name: The marker name is taken from the object name and the text in the text object. No sequential marker number is specified.
Options
Delete existing chapter markers: Deletes chapter markers that have already been set.
Only take the selected area into account: The chapter marker is automatically set to the area between the start and end markers only.
Delete chapter markers/delete all chapter markers
Delete one or all chapter markers. This removes chapter entries in the disc menu if the film is burned to disc.
Range markers(In & out points)
Range markers are the "in points" (range start) and "out points" (range end). They are used in the monitors to highlight a particular area that can be played with the "Range playback" button below the corresponding monitor.

To the left, you can see an in point (range start), and an out point is visible (range end) to the right
NOTE The value between both markers shows the length of the selected area according to the pattern Hours:Minutes:Seconds:Frames.
Change playback range
There are various options for changing the playback area and the start/end markers.
Move entire range
-
Press and hold the Ctrl key.
-
Click in the blue area between start and end markers.
-
Move the mouse to the left or the right while simultaneously holding the Ctrl key and clicking and holding the left mouse button.
Move range borders:
-
Click one of the markers in the upper bar in the project window and drag it.
-
Click on one of the markers below the program monitor and move it to the desired position by dragging it.
Reset the range edges
-
Operation with mouse and keyboard: Set the playback marker at the desired position and press "Set start of range (in-point)" or "Set end of range (out-point)" underneath the program monitor to set the in and out points of the range.
-
Start of the range using the mouse:
Left-click at the desired position in the top bar of the project window.
The beginning of the range will be set at this position.
If you click behind the end of the range, the playback range will be set to the entire length of the movie. -
End of the range using the mouse: Right-click at the desired position in the top bar of the project window.
The end of the range will be set at this position.
If you click in front of the end of the range, the playback range will be set to the entire length of the movie.
Range markers in the source monitor
In the source monitor the in and out points are set in the following way:
-
Set the playback marker at the desired position and press "Set range start" or "Set range end" underneath the monitor to set the in and out points.
-
Click on one of the markers below the monitor and move it to the desired position by dragging it.
-
You can adjust the position of the entire range by holding the Ctrl key and clicking the blue bar between the markers and moving it by dragging.
To find out more about the functions offered by range markers in the source monitor, please read the section on the topic Importing individual scenes from videos.
Scene markers
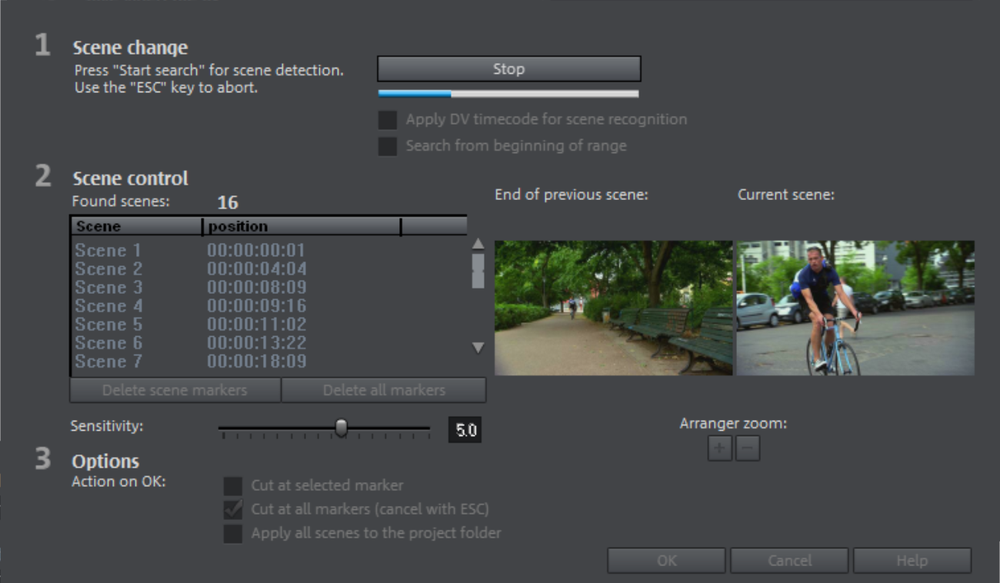
Scene markers are used to split a complete video into scenes. You can load any video into Video Pro X and have it divided into scenes or clips.
To do this, load a video into the project window. Then, right-click on the video and select "Scene detection". The following dialog appears:
After clicking "Start search", an overview of the detected scenes will be displayed underneath the scene control.
Delete scene markers: Here you can delete individual markers by selecting them from the list.
Delete all markers: Deletes all project markers.
Action on OK: You have three options. Either Video Pro X splits your video into individual scenes ("Cut at all markers"), a scene is selected and cut only at this position ("Cut at selected marker"),
 After deciding in favor of one of these options, red scene markers will appear on the timeline in the project window. The scenes can then be split according to the selected option and edited.
NOTE An important difference between a scene and a chapter marker is that a scene marker can be set only within a continuous video, while a chapter marker can include several consecutive videos.
More information about Scene recognition can be found here.
