Synchronizing stereoscopic 3D events
When shooting stereoscopic 3D using a pair of cameras, it is important to record a synchronizing event. Some users clap or snap their fingers in front of the cameras; others use a flash from a still camera, a pet-training clicker, or a professional slate.
-
If you're working with multistream 3D files or files that contain both images in each frame, you don't need to align events. When you add multistream media to a stereoscopic 3D project, the first stream will be used and paired with the next stream.
If you need to change the mode for a media file or swap the left/right images, you can use the Media tab of the Media Properties dialog.
 For more information, see Viewing or changing media file properties
 -
If you have two files that have synchronized timecode — such as video shot on a 3D camera that creates separate left- and right-eye clips — you don't need to align the audio and video. Just select the clips in the Project Media window and choose Pair as Stereoscopic 3D Subclip from the shortcut menu.
For more information, see
Pairing two media files as a stereoscopic 3D subclip
The first stream will be used and paired with the next stream. If you need to change the mode for a media file or swap the left/right images, you can use the Media tab of the Media Properties dialog.
-
If you want to add stereoscopic 3D depth to tracks using 3D compositing, you can use the Stereoscopic 3D Camera controls on the Track Motion dialog.
For more information, see 3D compositing
Supported multistream formats:
-
Dual-stream AVI or QuickTime files
-
3D AVC files created by 3D Bloggie HD cameras
-
MPO (multiple picture object) 3D still images
-
CineForm Neo3D 5.1 or later (a CineForm product or the free GoPro Studio is required to read Cineform Neo3D files)
-
Two separate files with names ending in _L and _R. When the left file is added to the project, VEGAS Pro automatically adds the right file as well and creates a stereoscopic 3D subclip.
-
Two separate files with pairing metadata from the Sony PMW-TD300 camera
-
Two separate files from the Sony PMW-F3 camera using 3D Link
-
Two separate files paired as described in this topic
-
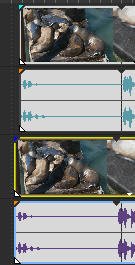
Add your media to the timeline using Add Across Tracks mode so the video for the left and right eyes is on separate tracks. In the following example, the left-eye track is above the right-eye track.
-
Use one of the following methods to align the audio and video so the video output is synchronized.
-
If you used a slate or a loud clap for your synchronization point, you can align the events to within a frame of each other using the audio waveforms:
-
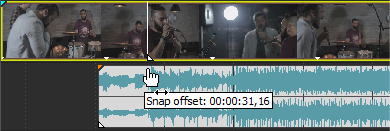
Roughly align the audio waveforms by dragging events in the timeline.
-
Use the Zoom controls at the bottom-right corner of the timeline to zoom in on the waveform.
For more information, see Zooming and magnification -
Verify Quantize to Frames is enabled because you want video frames to be aligned even if the audio is slightly out of alignment.
-
Drag a track's border to make the tracks taller and view large waveforms.
-
Use Shift+Up Arrow to magnify the waveforms if necessary.
-
Click the event you want to move and press 1 or 3 on the numeric keypad to nudge the event by frames to the left or right.
-
Synchronizing a video event:
-
Solo the video track.
-
Position the cursor at the synchronization point and drag the event's snap offset so it snaps to the cursor.
-
Repeat steps a and b for each clip.
-
Drag the cursor to a snap point, and then snap the other clips to the cursor.
If the cameras were not genlocked together (shooting at the same cadence) you may find one to be up to half a frame ahead of the other. Unless your scene has lots of fast motion, this is acceptable; just be sure to get them as close as possible on the timeline.
-
Verify alignment:
-
Drag the Level slider on the top track to set its opacity to 50%.
-
Find a portion of the video with good movement and verify the motion is the same in both clips and that one clip does not lead the other.
If the cameras were not genlocked together (shooting at the same cadence), you may find that one clip is up to half a frame ahead of the other. Unless your scene has fast motion, this is acceptable.
-
Select both video events, right-click one of the events, and choose Pair as Stereoscopic 3D Subclip.
One video event is deleted from the timeline, the active take for the event is set to the new multistream subclip, and a new multistream clip is added to the Project Media window. If you view the clip properties for the new subclip, you'll see that the Stereoscopic 3D Mode is set to Pair with next stream.
-
Delete the audio and video tracks you created in step 1.
After synchronizing the events, you will have a paired stereoscopic subclip in the Project Media window. You can drag these clips to the timeline as stereoscopic 3D media.
NOTE These steps require snapping to be enabled, so if you have not already done so, turn snapping on by clicking the Enable Snapping button  . For more information, see Enable snapping
-
You can also select tracks to pair stereoscopic subclips. Select both tracks, right-click one of the tracks, and choose Pair as Stereoscopic 3D Subclips. Overlapping events on the tracks are paired as stereoscopic subclips. If there is an empty track remaining, it is deleted.
-
If your camera rig used mirrors or inverted cameras and produced flipped or rotated images that were not corrected in camera, you can correct the clip with the Stereoscopic 3D Adjust plug-in.
For more information, see Aligning left- and right-eye views and adjusting depth