Audio track controls
The controls in the track list allow you to adjust track volume, panning, phase, assignable FX send levels, and bus send levels.
-
Audio track controls are duplicated on audio track channel strips in the Mixing Console window. Audio Track Channel Strips
-
To move faders and sliders in fine increments, hold Ctrl while dragging the control.
NOTE If you cannot find a trace control mentioned here, it's probably hidden. Click the More button  to specify which track control should be visible in the track header.
Changing a track's color
You can change the color of your tracks to create logical track groups.
To change a track's color, right-click the header and choose Track Display Color from the shortcut menu. Choose a color from the submenu to change the icon in the track list and the waveform in the timeline.
Use the Display tab in the Preferences dialog to edit the available colors.  For more information, see Preferences - Display Tab
Changing a track's height
Drag a track's bottom border to set its height. If you want to set a track's height as the default height for new tracks, you can right-click within the track list and choose Set Default Track Properties from the shortcut menu. For more information, see Setting default track properties
Click Minimize  to minimize a track vertically.
Click Maximize  to zoom in vertically so a track fills the timeline.
After minimizing or maximizing a track, click the Minimize or Maximize button again to return a track to its previous height.
Track height keyboard shortcuts
-
Press Ctrl+Shift+Up Arrow or Down Arrow to change the height of all tracks at once.
-
Press ` to minimize all tracks. Press again to restore tracks to their previous height. When restoring track height, tracks that you previously minimized are not restored—you can restore these tracks by clicking the Restore Track Height button
 on the track header.
 -
Press Ctrl+` to return all tracks to the default height.
Assigning a name to a track
-
Double-click in the Scribble Strip
 and type the track name.
If you do not see the Scribble Strip, expand the track to reveal it. The Scribble Strip appears above the Volume fader.

-
Press Enter to save the name.
Arming a track for recording
Click the Arm for Record button  on an audio track to prepare it for recording.
When you click the Record button on the main transport bar, all armed tracks will begin recording.
For more information about recording audio, see Recording audio
Inverting the phase of a track
Click the Invert Track Phase button  to reverse the phase of all events on an audio track.
Although inverting data does not make an audible difference in a single file, it can prevent phase cancellation when mixing or crossfading audio signals.
Select multiple tracks to invert several tracks simultaneously.
NOTE If the Invert event switch is selected, inverting the phase of the track will return the event to its original phase.
Adding or editing track effects
Click the Track FX button  to add effects to a track or edit the existing effects chain.
For more information about using track effects, see Adding audio effects
Muting a track
Click the Mute button  to prevent a track from being played in the mix. Click the Mute button on additional tracks to add them to the mute group. To unmute a track, click the Mute button again.
Click the Mute button in a track group header to temporarily suspend playback of all tracks in the group. Muting a track group overrides soloed tracks in the group.
NOTE Muting a track mutes its main output and post-fader sends only unless the Track prefader sends listen to mute checkbox on the Audio tab of the Preferences dialog is selected. For more information and examples about how the Track prefader sends listen to mute checkbox works, see Preferences - Audio Tab
Muting or unmuting a track
-
Deselect the Automation Settings button
 .
. -
Click the Mute button
.
TIP When you have a group of tracks muted, hold Ctrl while clicking the Mute button on an unmuted track to remove all other tracks from the mute group. Hold Ctrl while clicking the Mute button on a muted track to reset all Mute buttons.
Adjusting mute automation
When you select the Automation Settings button , the Mute button is displayed as  , and you can use the button to edit mute automation.
Soloing a track
Click the Solo button  to mute all unselected tracks. Click the Solo button on additional tracks to add them to the solo group. To remove a track from the solo group, click its Solo button again.
Click the Solo button in a track group header to isolate all tracks in the group for playback. Soloing a track group overrides muted tracks in the group.
TIP Hold Ctrl while clicking a Solo button to solo a single track and remove all other tracks from the solo group.
Choosing a track's input/recording device
The Record Input button  in a track header chooses the audio input that will be used to record to a track.
You can click the Record Input button to turn input monitoring on or off and choose a recording device.
Assigning a track to a bus
The bus button in a track header chooses the track's primary output. Assigning tracks to busses is especially useful for creating submixes that allow you to adjust the levels of multiple tracks at once or apply an effect to multiple tracks. For more information, see Creating a cue (headphone) mix with the Mixing Console
-
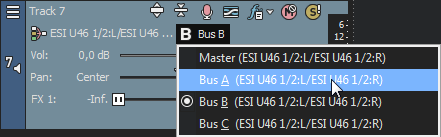
Click the bus button on the track.
The button is displayed as a
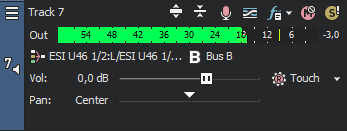
 when the track is routed to the master bus, and the bus letter is displayed (
 ,
,  , and so on) when a track is routed to another bus.
 -
Select the desired bus from the submenu. The Bus button changes to display the selected bus.
NOTE If the Bus button does not appear on the track, then you have not specified more than one bus in your project settings. For more information on specifying the number of busses for your project, see Adding audio busses
If you want to send a track to multiple outputs — for creating cue mixes or effects sends — you can use the multipurpose fader to control the level of the track sent to each bus or assignable effects chain. Creating a cue (headphone) mix with the Mixing Console and Using assignable effects
Monitoring track output levels
During playback, a responsive meter is displayed in the track header to monitor the track's output.
|
|
Horizontal meters |
|
|
Vertical meters |

When clipping is detected, the peak meter displays a red Clip indicator.
Right-click the meters and choose a command from the shortcut menu to adjust the display of the meters. This shortcut menu allows you to reset clip indicators, choose a display scale, toggle vertical display, or turn output meters off.
Adjusting a track's volume
The fader in the track header can function as a trim control that adjusts the overall volume of the track, or it can adjust track volume automation settings.
The trim level is added to the volume automation settings so your envelope is preserved, but with a boost or cut applied. For example, setting the trim control to -3 dB has the same effect as decreasing every envelope point by 3 dB.
TIP When adjusting the mix of your tracks, remember to look at the meters on the Master Bus. Because you are adding the volumes of all of the tracks together, it is easy to clip the audio output. Make sure that the meters never display the red Clip indication during playback.
Adjusting the volume trim level
-
Deselect the Automation Settings button
. -
Drag the Vol fader to control how loud a track is in the mix.
A value of 0 dB means that the track is played with no boost or cut. Dragging the fader to the left cuts the volume; dragging to the right boosts the volume.
You can hold Ctrl while dragging a fader to adjust the setting in finer increments, or double-click the fader to return it to 0 dB.
If multiple tracks are selected, all selected tracks are adjusted.
Adjusting the volume automation level
When you select the Automation Settings button , the fader thumb is displayed as a  , and you can use the control to edit volume automation. For more information, see Audio track automation
Panning a track
The Pan slider in the track header can function as a trim control that adjusts the overall panning of the track, or it can adjust track panning automation settings.
The trim level is added to the pan automation settings so your panning envelope is preserved, but with an offset applied. For example, setting the trim control to -9% left has the same effect as moving every envelope point 9% to the left.
Adjusting track panning trim levels
-
Deselect the Automation Settings button
. -
Drag the Pan slider to control the position of the track in the stereo field: dragging to the left will place the track in the left speaker more than the right, and dragging to the right will place the track in the right speaker.
You can hold Ctrl while dragging the slider to adjust the setting in finer increments, or double-click the slider to return it to 0.
If multiple tracks are selected, all selected tracks are adjusted.
Adjusting the track panning automation level
When you select the Automation Settings button , the Pan slider handle is displayed as a , and you can use the control to edit pan automation. For more information, see Audio track automation
Changing the pan mode
Right-click the fader handle and choose a pan type to change the behavior of the Pan slider. For more information about pan modes, see Audio panning modes
NOTE The selected panning mode is also used for track-level pan envelopes. For more information, see Audio track automation
Adjusting an assignable effects send level
The multipurpose slider in the track header can function as a trim control that adjusts the overall assignable effects send level of the track, or it can adjust assignable effects send automation settings.
The trim level is added to the assignable effects automation settings so your envelope is preserved, but with a boost or cut applied. For example, setting the trim control to -3 dB has the same effect as decreasing every envelope point by 3 dB.
-
FX sends are post-volume by default. To change to pre-volume, click the Pre/Post Volume Send button (or right-click the FX fader and choose Pre Volume from the shortcut menu).
-
If you want to apply track panning (including pan position and panning mode) to FX sends, right-click the FX fader and choose Link to Main Track Pan from the shortcut menu.
When Link to Main Track Pan is not selected, the track sends a center-panned stereo signal using the track's current panning mode.
-
Select the Use legacy track send gain checkbox on the Audio page of the Preferences dialog if you want to configure audio track sends to behave as they did in VEGAS Pro 7.0 and earlier. When the checkbox is selected, you can open projects created with earlier versions of VEGAS Pro and be assured they will sound the same as they did in earlier versions of VEGAS Pro.
For more information, see Preferences - Audio Tab
Adjusting the assignable effects trim level
-
Deselect the Automation Settings button
. -
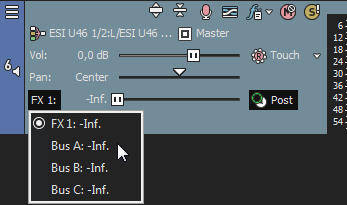
Click the label on the multipurpose slider and choose an assignable effects chain from the menu.
-
Drag the FX fader to control the level of the track sent to each of the assignable FX chains that you have created. Dragging the fader to the left cuts the volume; dragging to the right boosts the volume.
You can hold Ctrl while dragging a fader to adjust the setting in finer increments, or double-click the fader to return it to 0 dB.
If multiple tracks are selected, all selected tracks are adjusted.
Adjusting the assignable effects automation level
When you select the Automation Settings button , the fader thumb is displayed as a , and you can use the control to edit assignable effects send level automation. For more information, see Audio track automation
Adjusting a bus send level
The multipurpose slider in the track header can function as a trim control that adjusts the overall bus send level of the track, or it can adjust bus send automation settings.
The trim level is added to the bus send automation settings so your envelope is preserved, but with a boost or cut applied. For example, setting the trim control to -3 dB has the same effect as decreasing every envelope point by 3 dB.
-
Bus sends are pre-volume (and pre-mute) by default. When bus sends are pre-volume, you can create a cue mix that is independent of your main mix (like the monitor out on a hardware mixer).Creating a cue (headphone) mix with the Mixing Console To change to post-volume, click the Pre/Post Volume Send button (or right-click the bus fader and choose Post Volume from the shortcut menu. Post-volume sends are useful for effects sends because the send pays attention to the track's volume and mute controls.
-
If you want to apply track panning to bus sends (including pan position and panning mode), right click the bus fader and choose Link to Main Track Pan from the shortcut menu.
When Link to Main Track Pan is not selected, the track sends a center-panned stereo signal using the track's current panning mode.
-
Select the Use legacy track send gain checkbox on the Audio page of the Preferences dialog if you want to configure audio track sends to behave as they did in VEGAS Pro 7.0 and earlier. When the checkbox is selected, you can open projects created with earlier versions of VEGAS Pro and be assured they will sound the same as they did in earlier versions of VEGAS Pro.
For more information, see Preferences - Audio Tab
Adjusting the bus send trim level
-
Deselect the Automation Settings button
. -
Click the label on the multipurpose slider and choose a bus from the menu.
-
Drag the fader to control the level of the track sent to each of the additional busses that you have created for your project. Dragging the fader to the left cuts the volume; dragging to the right boosts the volume.
You can hold Ctrl while dragging a fader to adjust the setting in finer increments, or double-click the fader to return it to 0 dB.
If multiple tracks are selected, all selected tracks are adjusted.
Adjusting bus send automation
When you select the Automation Settings button , the fader thumb is displayed as a , and you can use the control to edit bus send level automation. For more information, see Audio track automation
Adjusting trim levels
The controls in the track header can function as trim controls or automation controls for track volume, panning, assignable effects send, and bus send levels. Adjusting the trim control affects the level of the entire track as it did in previous releases of VEGAS Pro.
The trim level is added to the track automation setting so your automation settings are preserved, but with a boost or cut applied. For example, setting the trim control to -3 dB has the same effect as decreasing every envelope point by 3 dB.
To adjust trim levels, deselect the Automation Settings button . When Automation Settings is selected, the volume fader and multipurpose slider adjust automation settings.